----
Integrating XenServer, RDO and Neutron
// Latest blog entries
XenServer is a great choice of hypervisor for OpenStack based clouds, but there is no native integration between it and RedHat's RDO packages. This means that setting up an integrated environment using XenServer and RDO is more difficult than it should be. This blog post aims to resolve that, giving a method where CentOS can be set up easily to use XenServer as the hypervisor.
Environment
- Hypervisor: XenServer: 6.5
- Guest: CentOS 7.0
- OpenStack: Liberty
- Network: Neutron, ML2 plugin, OVS, VLAN
Install XenServer
The XenServer integration with OpenStack has some optimizations which means that only EXT3 storage is supported. Make sure when installing your XenServer you select Optimized for XenDesktop when prompted. Use XenCenter to check that the SR type is EXT3 as fixing it after creating the VMs will require deleting the VMs and starting again.
Install OpenStack VM
With XenServer, the Nova Compute service must run in a virtual machine on the hypervisor that they will be controlling. As we're using CentOS 7.0 for this environment, create a VM using the CentOS 7.0 template in XenCenter. If you want to copy and paste the scripts from the rest of the blog, use the name "CentOS_RDO" for this VM. Install the CentOS 7.0 VM but shut it down before installing RDO.
Create network for OpenStack VM
In single box environment, we need three networks, "Integration network", "External network", "VM network". If you have appropriate networks for the above (e.g. a network that gives you external access) then rename the existing network to have the appropriate name-label. Note that a helper script rdo_xenserver_helper.sh is provided for some of the later steps in this blog rely on these specific name labels, so if you choose not to use them then please also update the helper script.
You can do this via XenCenter or run the following commands in dom0:
xe network-create name-label=openstack-int-network xe network-create name-label=openstack-ext-network xe network-create name-label=openstack-vm-network
Create virtual network interfaces for OpenStack VM
This step requires the VM to be shut down, as it's modifying the network setup and the PV tools have not been installed in the guest.
vm_uuid=$(xe vm-list name-label=CentOS_RDO minimal=true) vm_net_uuid=$(xe network-list name-label=openstack-vm-network minimal=true) next_device=$(xe vm-param-get uuid=$vm_uuid param-name=allowed-VIF-devices | cut -d';' -f1) vm_vif_uuid=$(xe vif-create device=$next_device network-uuid=$vm_net_uuid vm-uuid=$vm_uuid) xe vif-plug uuid=$vm_vif_uuid ext_net_uuid=$(xe network-list name-label=openstack-ext-network minimal=true) next_device=$(xe vm-param-get uuid=$vm_uuid param-name=allowed-VIF-devices | cut -d';' -f1) ext_vif_uuid=$(xe vif-create device=$next_device network-uuid=$ext_net_uuid vm-uuid=$vm_uuid) xe vif-plug uuid=$ext_vif_uuid
You can also choose use helper script to do these in dom0.
    source rdo_xenserver_helper.sh
    create_vif
Configure OpenStackVM/Hypervisor communications
Use HIMN tool (plugin for XenCenter) to add internal management network to OpenStack VMs. This effectively performs the following operations, which could also be performed manually in dom0 or use rdo_xenserver_helper.sh.
    source rdo_xenserver_helper.sh
    create_himn
Note: If using the commands manually, they should be run when the OpenStack VM is shut down.
Set up DHCP on the HIMN network for OpenStack VM, allowing OpenStack VM to access its own hypervisor on the static address 169.254.0.1. Run helper script in domU.
    source rdo_xenserver_helper.sh
    active_himn_interface
Install RDO
Using the RDO Quickstart detailed installation guide, please follow the instructions step by step. This manual only points out the steps that you must pay attention to during installation.
Run Packstack to install OpenStack
Rather than running packstack immediately, we need to generate an answerfile so that we can tweak the configuration.
Generate answer file:
packstack --gen-answer-file=
Install OpenStack services:
packstack --answer-file=
These items in should be changed as below:
    CONFIG_NEUTRON_ML2_TYPE_DRIVERS=vlan
    CONFIG_NEUTRON_ML2_TENANT_NETWORK_TYPES=vlan
These items in should be changed according to your environment:
    CONFIG_NEUTRON_ML2_VLAN_RANGES=
    CONFIG_NEUTRON_OVS_BRIDGE_MAPPINGS=
    CONFIG_NEUTRON_OVS_BRIDGE_IFACES=
NOTE:
: physnet1 is physical network name for VLAN provider and tenant networks. 1000:1050 is VLAN tag ranges on each physical network for allocation to tenant networks.
: br-eth1 is OVS bridge for VM network. br-ex is OVS bridge for External network, neutron L3 agent use it for external traffic.
: eth1 is OpenStack VM's NIC which connected to VM network. eth2 is OpenStack VM's NIC which connected to External network.
Configure Nova and Neutron
Copy Nova and Neutron plugins to XenServer host.
    source rdo_xenserver_helper.sh
    install_dom0_plugins
Edit /etc/nova/nova.conf, switch compute driver to XenServer.
    [DEFAULT]
    compute_driver=xenapi.XenAPIDriver

    [xenserver]
    connection_url=http://169.254.0.1
    connection_username=root
    connection_password=
    vif_driver=nova.virt.xenapi.vif.XenAPIOpenVswitchDriver
    ovs_int_bridge=
NOTE:
The integration_bridge above can be found from dom0:
xe network-list name-label=openstack-int-network params=bridge
169.254.0.1 is hypervisor dom0's address which OpenStack VM can reach via HIMN.
Install XenAPI Python XML RPC lightweight bindings.
    yum install -y python-pip
    pip install xenapi
Configure Neutron
Edit /etc/neutron/rootwrap.conf to support uing XenServer remotely.
    [xenapi]
    # XenAPI configuration is only required by the L2 agent if it is to
    # target a XenServer/XCP compute host's dom0.
    xenapi_connection_url=http://169.254.0.1
    xenapi_connection_username=root
    xenapi_connection_password=
Restart Nova and Neutron Services
    for svc in api cert conductor compute scheduler; do
        service openstack-nova-$svc restart;
    done
    service neutron-openvswitch-agent restart
Launch another neutron-openvswitch-agent to talk with dom0
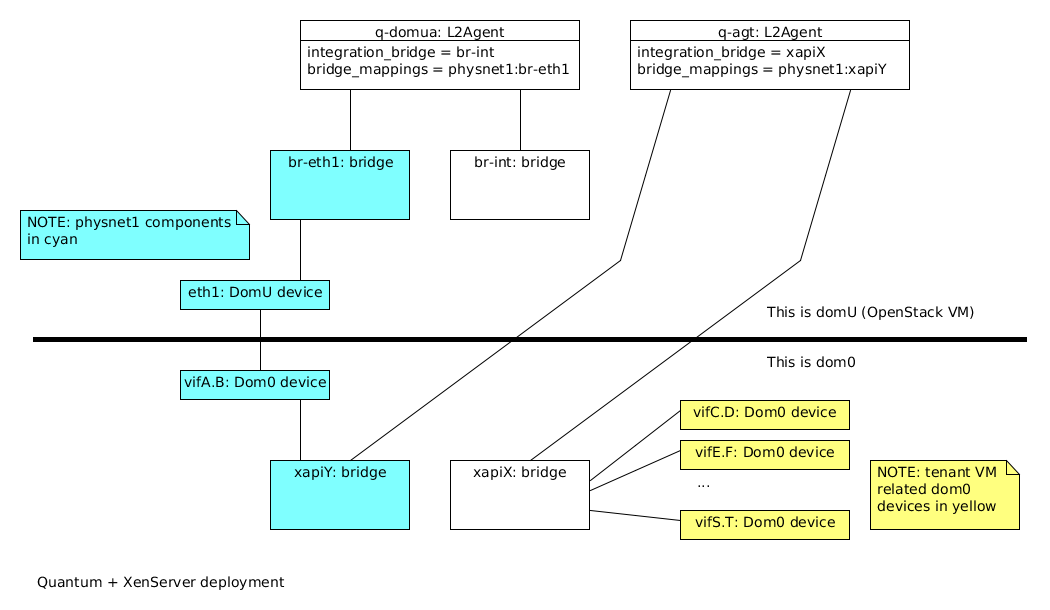
XenServer has a seperation of dom0 and domU and all instances' VIFs are actually managed by dom0. Their corresponding OVS ports are created in dom0. Thus, we should manually start the other ovs agent which is in charge of these ports and is talking to dom0, refer xenserver_neutron picture.
Create ovs configuration file
cp /etc/neutron/plugins/ml2/openvswitch_agent.ini etc/neutron/plugins/ml2/openvswitch_agent.ini.dom0
    [ovs]
    integration_bridge = xapi3
    bridge_mappings = physnet1:xapi2

    [agent]
    root_helper = neutron-rootwrap-xen-dom0 /etc/neutron/rootwrap.conf
    root_helper_daemon =
    minimize_polling = False

    [securitygroup]
    firewall_driver = neutron.agent.firewall.NoopFirewallDriver
NOTE:
xapi3 the integration bridge is xapX in the graph. xapi2 is vm network bridge, it's xapiY in the graph.
xe network-list name-label=openstack-int-network params=bridgexe network-list name-label=openstack-vm-network params=bridge
Launch neutron-openvswitch-agent
Replace cirros guest with one setup to work for XenServer
    /usr/bin/python2 /usr/bin/neutron-openvswitch-agent \
       --config-file /usr/share/neutron/neutron-dist.conf \
       --config-file /etc/neutron/neutron.conf --config-file \
       /etc/neutron/plugins/ml2/openvswitch_agent.ini.dom0 \
       --config-dir /etc/neutron/conf.d/neutron-openvswitch-agent \
       --log-file /var/log/neutron/openvswitch-agent.log.dom0 &
    nova image-delete cirros
    wget http://ca.downloads.xensource.com/OpenStack/cirros-0.3.4-x86_64-disk.vhd.tgz

    glance image-create --name cirros --container-format ovf \
       --disk-format vhd --property vm_mode=xen --visibility public \
       --file cirros-0.3.4-x86_64-disk.vhd.tgz
Launching instance and test its connectivity
    source keystonerc_demo
    [root@localhost ~(keystone_demo)]# glance image-list
    +--------------------------------------+--------+
    | ID                                   | Name   |
    +--------------------------------------+--------+
    | 5c227c8e-3cfa-4368-963c-6ebc2f846ee1 | cirros |
    +--------------------------------------+--------+
    [root@localhost ~(keystone_demo)]# neutron net-list
    +--------------------------------------+---------+--------------------------------------------------+
    | id                                   | name    | subnets                                          |
    +--------------------------------------+---------+--------------------------------------------------+
    | 91c0f6ac-36f2-46fc-b075-6213a241fc2b | private | 3a4eebdc-6727-43e3-b5fe-8760d64c00fb 10.0.0.0/24 |
    | 7ccf5c93-ca20-4962-b8bb-bff655e29788 | public  | 4e023f19-dfdd-4d00-94cc-dbea59b31698             |
    +--------------------------------------+---------+--------------------------------------------------+
    nova boot --flavor m1.tiny --image cirros --nic \
        net-id=91c0f6ac-36f2-46fc-b075-6213a241fc2b demo-instance
    [root@localhost ~(keystone_demo)]# neutron floatingip-create public      Created a new floatingip:
    +---------------------+--------------------------------------+
    | Field               | Value                                |
    +---------------------+--------------------------------------+
    | fixed_ip_address    |                                      |
    | floating_ip_address | 172.24.4.228                         |
    | floating_network_id | 7ccf5c93-ca20-4962-b8bb-bff655e29788 |
    | id                  | 2f0e7c1e-07dc-4c7e-b9a6-64f312e7f693 |
    | port_id             |                                      |
    | router_id           |                                      |
    | status              | DOWN                                 |
    | tenant_id           | 838ec33967ff4f659b808e4a593e7085     |
    +---------------------+--------------------------------------+
nova add-floating-ip demo-instance 172.24.4.228
After these above steps, we have succefully booted an instance with floating ip, use "nova list" will output the instances
    [root@localhost ~(keystone_demo)]# nova list
    +--------------------------------------+---------------+--------+------------+-------------+--------------------------------+
    | ID                                   | Name          | Status | Task State | Power State | Networks                       |
    +--------------------------------------+---------------+--------+------------+-------------+--------------------------------+
    | ac82fcc8-1609-4d34-a4a7-80e5985433f7 | demo-inst1    | ACTIVE | -          | Running     | private=10.0.0.3, 172.24.4.227 |
    | f302a03f-3761-48e6-a786-45b324182545 | demo-instance | ACTIVE | -          | Running     | private=10.0.0.4, 172.24.4.228 |
    +--------------------------------------+---------------+--------+------------+-------------+--------------------------------+
Test the connectivity via floating ip, "ping 172.24.4.228" at the OpenStack VM, will properbly get outputs like:
    [root@localhost ~(keystone_demo)]# ping 172.24.4.228      PING 172.24.4.228 (172.24.4.228) 56(84) bytes of data.
    64 bytes from 172.24.4.228: icmp_seq=1 ttl=63 time=1.76 ms
    64 bytes from 172.24.4.228: icmp_seq=2 ttl=63 time=0.666 ms
    64 bytes from 172.24.4.228: icmp_seq=3 ttl=63 time=0.284 ms
Read More
----
Shared via my feedly reader
Sent from my iPhone
No comments:
Post a Comment