Posts on Security, Cloud, DevOps, Citrix, VMware and others.
Words and views are my own and do not reflect on my companies views.
Disclaimer: some of the links on this site are affiliate links, if you click on them and make a purchase, I make a commission.
As open source companies and projects enter a transition phase of funding, licensing, community participation, let’s look at the characteristics of successful open source projects.
Google has announced that it's going to start blocking websites that use certificates from Entrust starting around November 1, 2024, in its Chrome browser, citing compliance failures and the certificate authority's inability to address security issues in a timely manner.
"Over the past several years, publicly disclosed incident reports highlighted a pattern of concerning behaviors by Entrust that fall short of the above expectations, and has eroded confidence in their competence, reliability, and integrity as a publicly-trusted [certificate authority] owner," Google's Chrome security team said.
To that end, the tech giant said it intends to no longer trust TLS server authentication certificates from Entrust starting with Chrome browser versions 127 and higher by default. However, it said that these settings can be overridden by Chrome users and enterprise customers should they wish to do so.
Google further noted that certificate authorities play a privileged and trusted role in ensuring encrypted connections between browsers and websites, and that Entrust's lack of progress when it comes to publicly disclosed incident reports and unrealized improvement commitments poses risks to the internet ecosystem.
The blocking action is expected to cover Windows, macOS, ChromeOS, Android, and Linux versions of the browser. The notable exception is Chrome for iOS and iPadOS, due to Apple's policies that don't permit the Chrome Root Store from being used.
As a result, users navigating to a website that serves a certificate issued by Entrust or AffirmTrust will be greeted by an interstitial message that warns them that their connection is not secure and isn't private.
Affected website operators are urged to move to a publicly-trusted certificate authority owner to minimize disruption by October 31, 2024. According to Entrust's website, its solutions are used by Microsoft, Mastercard, VISA, and VMware, among others.
"While website operators could delay the impact of blocking action by choosing to collect and install a new TLS certificate issued from Entrust before Chrome's blocking action begins on November 1, 2024, website operators will inevitably need to collect and install a new TLS certificate from one of the many other CAs included in the Chrome Root Store," Google said.
Found this article interesting? Follow us on Twitter and LinkedIn to read more exclusive content we post.
from The Hacker News https://ift.tt/NU0yrte
via IFTTT
A malicious cyber actor thought to be behind the WhisperGate attacks on Ukraine in the days prior to Russia’s invasion, as well as attacks on NATO and U.S. computer networks has been indicted by the DoJ.
Amin Stigal, a 22-year old Russian national, is alleged to have managed infrastructure used by Russia’s GRU to stage malicious payloads used in WhisperGate malware campaigns, targeting the Ukrainian government and later U.S allies. U.S. Attorney General Merrick B. Garland said that Stigal conspired with Russian military intelligence to aid the Russian military, including in attacks on government systems and data with no military or defense-related roles.
WhisperGate is one of a number of wiper malware families used in intrusions against government and other institutions in Ukraine in early 2022. Designed to look like ransomware, wipers attempt to destroy the target computer and related data.
In conjunction with attacking systems with WhisperGate, Stigal allegedly helped the GRU to compromise other systems, exfiltrate sensitive data and deface websites. Some of the stolen data later appeared on public forums and included patient health records.
Stigal remains at large but if caught and convicted faces a penalty of five years in prison. Rewards for Justice is offering up to $10 million in bounty for information leading to his capture.
The Bad | Ransomware as a Tool for Spies
There’s been no shortage of bad news thanks to ransomware in our weekly cybersecurity news roundup over the years, but this week SentinelLabs put the spotlight on yet another evolution of this egregious threat. It appears that ransomware has become a tool of choice not just for financially-motivated threat actors but also for those engaged in cyberespionage.
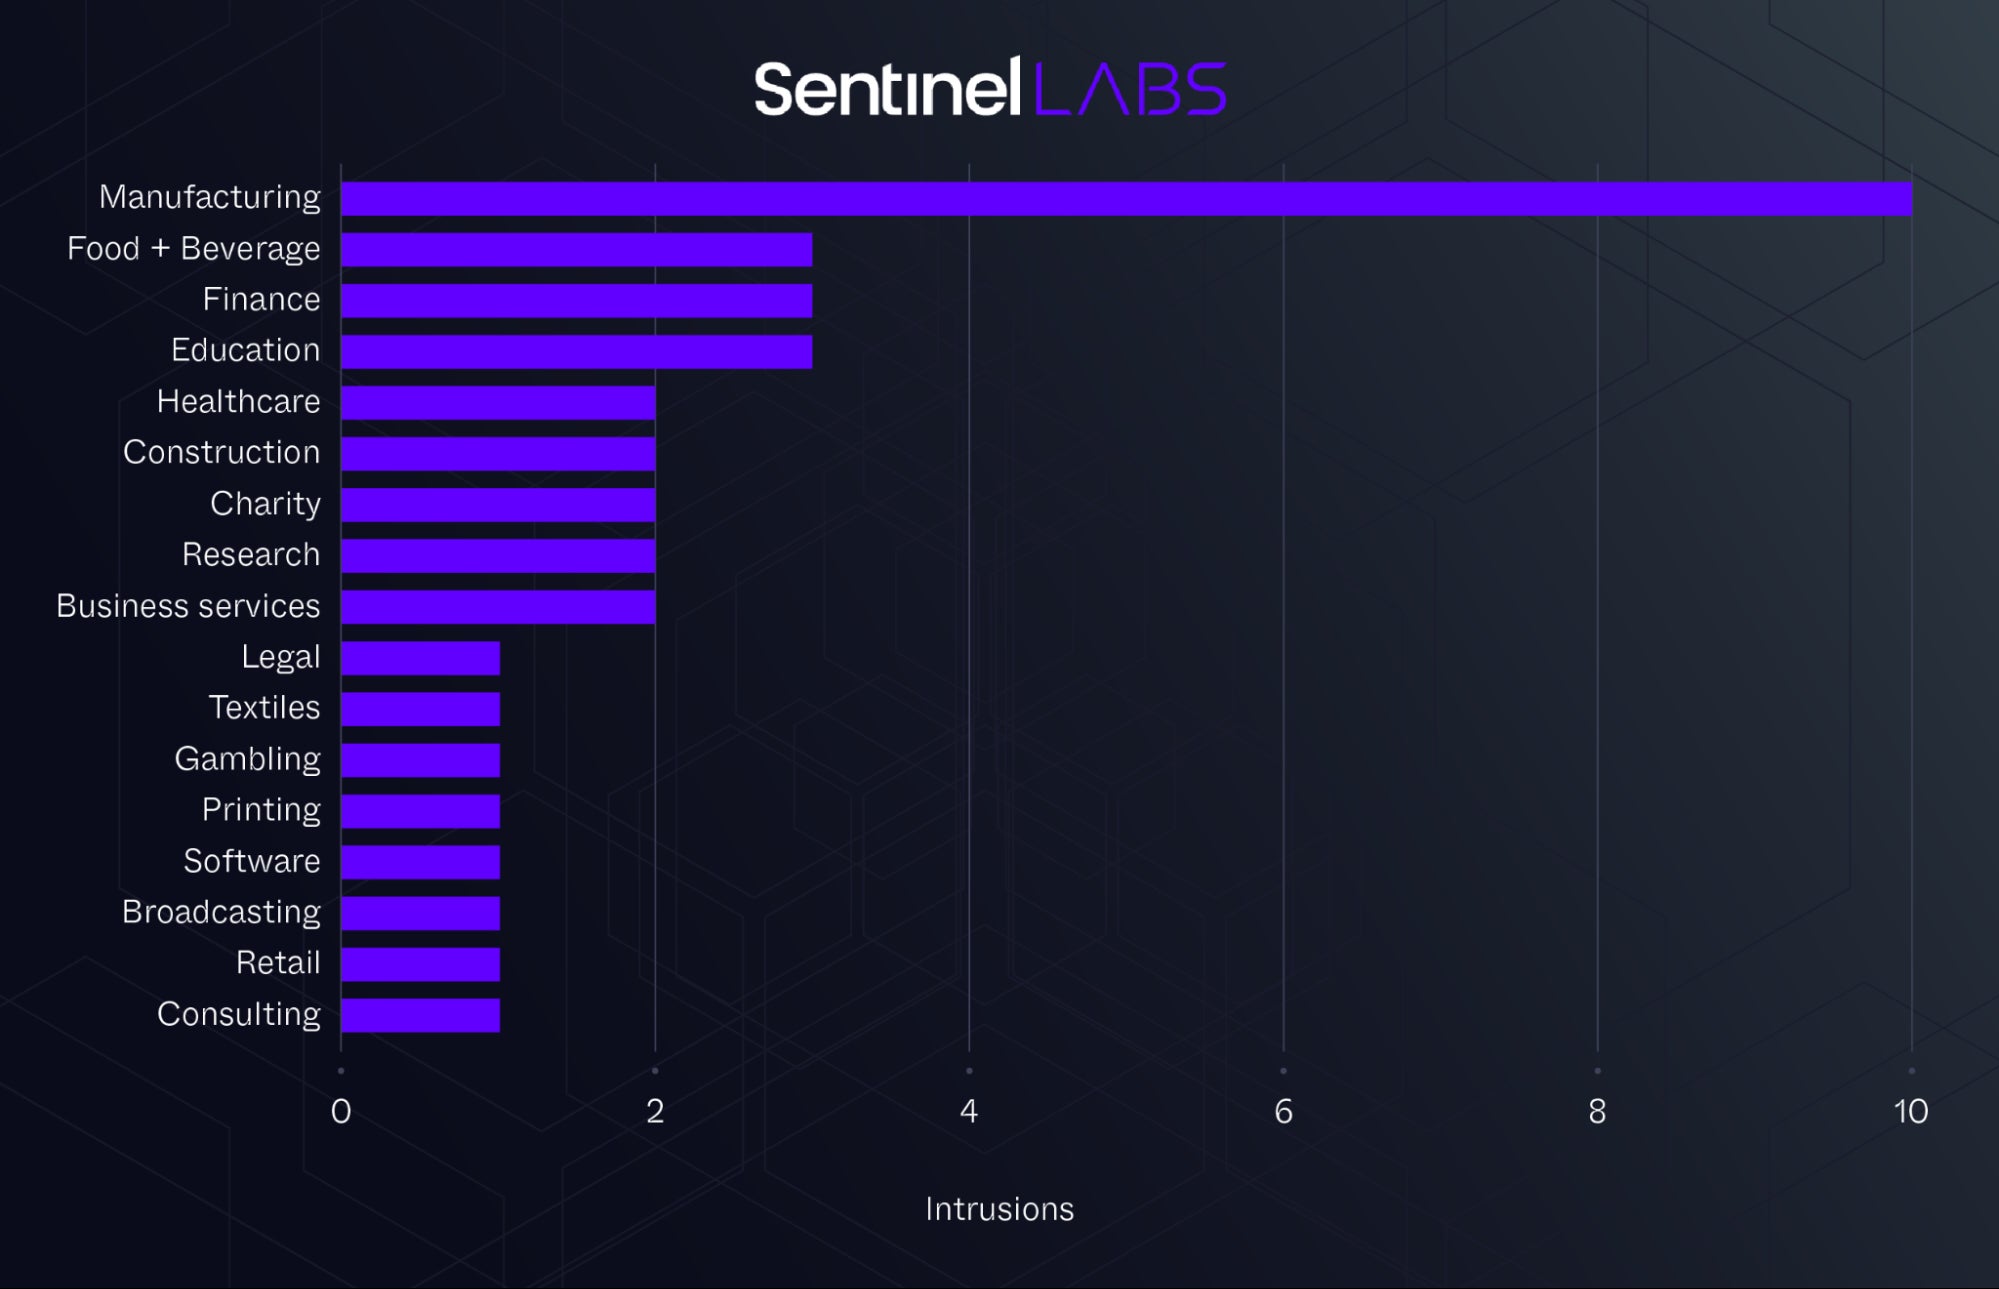
Suspected Chinese APT group ChamelGang targeted multiple organizations with CatB ransomware, including the Presidency of Brazil and India’s healthcare institution AIIMS. In addition, the group is believed to have targeted a government organization in East Asia and critical infrastructure sectors, including an aviation organization in the Indian subcontinent. In unrelated incidents, a separate cluster of intrusions involving off-the-shelf tools BestCrypt and BitLocker have been deployed by espionage actors in a variety of industries, primarily those involved in the U.S. manufacturing sector, across North America, South America and Europe.
Intrusions attributed to cyber espionage actors deploying ransomware
What could spies, whose tradecraft typically relies on stealth, want with the noisiest of all malwares, one that literally announces to the user that they have been compromised by splashing a ransom note on the screen and locking files?
The answer to that lies, in part, in the way that organizations respond to ransomware incidents. These are typically reported to local law enforcement agencies which may not share critical data and insights with intelligence agencies. In addition, as organizations across the world ride out a wave of ransomware attacks from an increasing number of unsophisticated-yet-effective cyber criminals buying cheap RaaS offerings, cyberespionage actors can disguise their operations and avoid attribution by dropping ransomware payloads after completing their other objectives.
For cyber spies, deploying ransomware as a final payload affords various opportunities to cause disruption, distraction, misattribution, and the removal of evidence as they conduct their more discrete operations. The researchers also point out that some APTs are not averse to funding their own operations with funds stolen from the organizations they spy on, either.
The Ugly | MOVEit CVE-2024-5806 – Exploit Attempts in Progress
Researchers are warning that a CVSS 9.1 rated vulnerability in Progress Software’s MOVEit Transfer is seeing in-the-wild attempts to exploit it, beginning within hours of the patch becoming available.
CVE-2024-5806 affects MOVEit Transfer version 2023.0.0 earlier than 2023.0.11, version 2023.1.0 earlier than 2023.1.6, and version 2024.0.0. The bug is described as being able to lead to an authentication bypass and can be exploited to allow an attacker to impersonate another user on the system.
Researchers from Rapid7 say they believe that prerequisites for the attack involve knowing an existing user’s name, targeting an account that can be authenticated remotely, and having an SFTP service open to the public internet. Censys research estimates that there are around 2,700 exposed instances of MOVEit Transfer on the internet, with the majority of those in the U.S.
Very shortly after vulnerability details were published today we started observing Progress MOVEit Transfer CVE-2024-5806 POST /guestaccess.aspx exploit attempts. If you run MOVEit & have not patched yet – please do so now: https://t.co/AenLgqg1wM
— The Shadowserver Foundation (@Shadowserver) June 25, 2024
A previous flaw in MOVEit Transfer was used in attacks by Cl0p ransomware around this time last year. In May and June 2023, CVE-2023-34362 was used to deliver webshells that allowed the attackers to exfiltrate files, including files hosted on Windows Azure if the MOVEit instances was configured to use Azure’s blob services storage. SentinelOne observed opportunistic attacks against more than 20 organizations during that time.
Progress says it strongly urges all MOVEit Transfer customers on versions 2023.0, 2023.1 and 2024.0 to upgrade to the latest patched version immediately, and also to apply the mitigation steps described here.
This post was written in collaboration with Docker AI/ML Hackathon participants Gitanshu Sankhla and Vijay Barma.
In this AI/ML Hackathon post, we’ll share another interesting winning project from last year’s Docker AI/ML Hackathon. This time, we will dive into ReadMeAI, one of the honorable mention winners.
For many developers, planning and writing code is the most enjoyable part of the process. It’s where creativity meets logic, and lines of code transform into solutions. Although some developers find writing documentation equally fulfilling, crafting clear and concise code instructions isn’t for everyone.
Imagine you’re a developer working on a complex project with a team. You just pushed your final commit with a sign of relief, but the clock is ticking on your deadline. You know that clear documentation is crucial. Your teammates need to understand your code’s intricacies for smooth integration, but writing all that documentation feels like another project entirely, stealing your precious time from bug fixes and testing. That’s where ReadMeAI, an AI-powered README generator fits in.
What makes ReadMeAI unique?
The following demo, which was submitted to the AI/ML Hackathon, provides an overview of ReadMeAI (Figure 1).
Figure 1: Demo of the ReadMeAI as submitted to the AI/ML Hackathon.
The ReadMeAI tool allows users to upload a code file and describe their project. The tool generates Markdown code, which can be edited in real-time using a code editor, and the changes are previewed instantly.
The user interface of ReadmeAI is designed to be clean and modern, making the application easy to use for all users.
Benefits of ReadMeAI include:
Effortless documentation: Upload your code, provide a brief description, and let ReadMeAI generate a comprehensive markdown file for your README seamlessly.
Seamless collaboration: ReadMeAI promotes well-structured READMEs with essential sections, making it easier for your team to understand and contribute to the codebase, fostering smoother collaboration.
Increased efficiency: Stop wasting time on boilerplate documentation. ReadMeAI automates the initial draft of your README, freeing up valuable developer time for coding, testing, and other crucial project tasks.
Use cases include:
API documentation kick-off: ReadMeAI provides a solid foundation for your API documentation. It generates an initial draft outlining API endpoints, parameters, and expected responses. This jumpstarts your process and lets you focus on the specifics of your API’s functionality.
Rapid prototyping and documentation: During rapid prototyping, functionality often takes priority over documentation. ReadMeAI bridges this gap. It quickly generates a basic README with core information, allowing developers to have documentation in place while focusing on building the prototype.
Open source project kick-off: ReadMeAI can jumpstart the documentation process for your open source project. Simply provide your codebase and a brief description, and ReadMeAI generates a well-structured README file with essential sections like installation instructions, usage examples, and contribution guidelines. This saves you time and ensures consistent documentation across your projects.
Focus on what you do best — coding. Let ReadMeAI handle the rest.
How does it work?
ReadMeAI converts code and description into a good-looking README file. Users can upload code files and describe their code in a few words, and ReadMeAI will generate Markdown code for your README. You will get a built-in editor to format your README according to your needs, and then you can download your README in Markdown and HTML format.
Figure 2 shows an overview of the ReadMeAI architecture.
Figure 2: Architecture of the ReadMeAI tool displaying frontend and backend.
Technical stack
The ReadMeAI tech stack includes:
Node.js: A server-side runtime that handles server-side logic and interactions.
Express: A popular Node.js framework that handles routing, middleware, and request handling.
Google PaLM API: Google’s Pathways Language Model (PaLM) is a 540-billion parameter transformer-based large language model. It is used in the ReadMeAI project to generate a Markdown README based on the uploaded code and user description.
Embedded JavaScript (EJS): A templating engine that allows you to render and add dynamic content to the HTML on the server side.
Cascading Style Sheets (CSS): Add styling to the generated Markdown content.
JavaScript: Add interactivity to the front end, handle client-side logic, and communicate with the server side.
AI integration and markdown generation
The AI integration is handled by the controllers/app.js file (as shown below), specifically in the postApp function. The uploaded code and user description are passed to the AI integration, which uses the Google Palm API to generate a Markdown README.
The Markdown generator is implemented in the postApp function. The AI-generated content is converted into Markdown format using the showdown library.
The controller functions (gettApp, getUpload, postApp, postDownload) handle the incoming requests and interact with the AI integration, markdown generator, and views. After generating the Markdown content, the controllers pass the generated content to the appropriate views.
These controller functions are then exported and used in the routes defined in the routes/app.js file.
Views
The views are defined in the views/ directory. The editor.ejs file is an Embedded JavaScript (EJS) file that is responsible for rendering the editor view. It is used to generate HTML markup that is sent to the client.
<%- include('includes/head.ejs') %>
<!-- google fonts -->
<link rel="stylesheet" href="https://fonts.googleapis.com/css2?family=Material+Symbols+Outlined:opsz,wght,FILL,GRAD@24,400,0,0" />
<!-- stylesheets -->
<link rel="stylesheet" href="/css/edistyles.css">
<link rel="stylesheet" href="/css/output.css">

</head>
<body>
    <header class="header-nav">
            <h1 class="logo">ReadMeAI</h1>
            <div class="light-container">
                <div class="phone">
                    <span class="material-symbols-outlined" id="rotate-item">
                    phone_iphone</span>
                </div>
                <div class="tubelight">
                    <div class="bulb"></div>
                </div>
            </div>
        </header>
        <main class="main">
        <div class="mobile-container">
            <p>Sorry but the editor is disable on mobile device's, but it's best experienced on a PC or Tablet </p>
.....
                <button class="btn-containers" id="recompile">
                    <span class="material-symbols-outlined">bolt</span>
                </button>
            </header>
            <textarea name="textarea" id="textarea" class="sub-container output-container  container-markdown" ><%= md %></textarea>
        </div>
.....
    <!-- showdown cdn -->
    <script src="https://cdnjs.cloudflare.com/ajax/libs/showdown/2.1.0/showdown.min.js" integrity="sha512-LhccdVNGe2QMEfI3x4DVV3ckMRe36TfydKss6mJpdHjNFiV07dFpS2xzeZedptKZrwxfICJpez09iNioiSZ3hA==" crossorigin="anonymous" referrerpolicy="no-referrer"></script>
    <!-- ionicons cdn -->
    <script type="module" src="https://unpkg.com/ionicons@7.1.0/dist/ionicons/ionicons.esm.js"></script>
    <script nomodule src="https://unpkg.com/ionicons@7.1.0/dist/ionicons/ionicons.js"></script>

    <script src="/scripts/edi-script.js"></script>
    <script src="/scripts/tubelightBtn.js"></script>
</body>
Rendering the view
The controllers render the appropriate views with the generated content or serve API responses. The editor.ejs view is rendered with the generated Markdown content (html: html, md: data).
When the postApp function is called, the palmApi.getData function is used to fetch data from the Palm API based on the template, the incoming Markdown content, and the provided description. Once the data is fetched, the converter.makeHtml function is used to convert the Markdown content to HTML.
The res.render function is then used to render the editor view with the generated HTML content and Markdown content. The editor.ejs view should have the necessary code to display the HTML content and Markdown content in the desired format.
This approach allows for the dynamic generation of README content based on the incoming Markdown content and the provided template. The generated HTML content then gets rendered into the web page for the user to view.
Sending the response
The rendered view is sent as a response to the client using the res.render function. This function is used to render a view. This process ensures that the generated Markdown content is dynamically rendered into a web page using the provided template, and the web page is then sent as a response to the client.
Select Explore and upload your source code file by selecting Click to upload file (Figure 5).
Figure 5: The Main UI page that allows users to upload their project file.
Once you finish describing your project, select Generate (Figure 6).
Figure 6: Uploading the project file and creating a brief description of the code/project.
ReadMeAI utilizes Google’s Generative Language API to create draft README files based on user-provided templates, code snippets, and descriptions (Figure 7).
Figure 7: Initial output from ReadMeAI. The built-in editor makes minor changes simple.
What’s next?
ReadMeAI was inspired by a common problem faced by developers: the time-consuming and often incomplete task of writing project documentation. ReadMeAI was developed to streamline the process, allowing developers to focus more on coding and less on documentation. The platform transforms code and brief descriptions into comprehensive, visually appealing README files with ease.
We are inspired by the ingenuity of ReadMeAI, particularly in solving a fundamental issue in the developer community.
Looking ahead, the creators plan to enhance ReadMeAI with features like GitHub integration, custom templates, and improved AI models such as Llama. By adopting newer technologies and architectures, they plan to make ReadMeAI even more powerful and efficient.
We recently wrote about how attackers have learned to use legitimate social media infrastructure to deliver plausible-looking warnings about the blocking of business accounts, leading to password theft. It turns out that for several months now, a very similar method has been used to attack developer accounts on GitHub, which is a cause for concern for corporate information security teams (especially if developers have administrative access to corporate related repositories on GitHub). Let’s explore how this attack works.
GitHub account hijacking
Victims of this attack receive emails sent from a genuine GitHub email address. The emails claim that the GitHub team is looking for an experienced developer and offering attractive conditions — $180,000 per year plus a generous benefits package. If interested in the position, the recipient is invited to apply via a link.
The attack begins with an email: GitHub is supposedly seeking a developer for a $180,000 annual salary. Source
These emails do come from notifications@github.com, which really belongs to the service. However, an astute recipient might wonder why the HR team is using the notification address for job offers. They might also be puzzled that the email subject has nothing to do with the job offer, and instead ends with a list of several GitHub usernames.
However, the email’s authors send it out en masse, so they probably aren’t too worried about losing a few potential targets here. The attackers are satisfied with the small number of recipients who’ll be too distracted by the salary to notice the discrepancies.
Clicking the link in the email takes the recipient to a page that pretends to be the GitHub career site. Specifically, the addresses githubtalentcommunity[.]online and githubcareers[.]online have been used in this campaign — but these phishing sites are no longer available.
On the linked site, recipients are asked to authorize a malicious OAuth application. Source
On the site, developers interested in the position are asked to log in to their GitHub account and authorize a new OAuth application. This application requests numerous permissions — including access to private repositories, personal data, and discussions, as well as the ability to delete any repository managed by the targeted user.
The OAuth application requests a number of dangerous permissions. Source
Besides job offers, another type of email has been observed, claiming that GitHub had been hacked and the GitHub security team requires the user’s authorization to eliminate the consequences of the hack.
Phishing email variant warning of a GitHub hack. Source
The next thing: repository wipe and ransom demand
If an inattentive developer grants the malicious OAuth application all the requested permissions, the attackers begin exploiting them. They empty all the victim’s repositories and then rename them — leaving behind only a single README.me file.
Hijacked and emptied repositories on GitHub with ransom notes left by the attackers. Source
The file contains a message stating that the data has been compromised, but that a backup has been made. To restore the data, the victim is instructed to contact a user named Gitloker on Telegram.
It appears that these emails are sent using the GitHub discussion system. That is, the attackers use already compromised accounts to create messages with the email text under various topics, tagging several users. As a result, all the tagged users receive emails from the notifications@github.com address. These messages are likely deleted immediately after sending.
How to protect against such attacks on GitHub accounts
Experienced users and developers often consider themselves to be immune to phishing attacks. However, as this story shows, they can also be caught off guard: the operators of this phishing campaign have already managed to compromise and wipe dozens of repositories.
To prevent your developers from falling victim to this attack, give them the following recommendations:
Always carefully check all details of an email and compare its subject, text, and sender address. Any discrepancies are almost certainly signs of a phishing attempt rather than accidental errors.
If you receive a similar email from GitHub, don’t click any links in it, and report the email to GitHub support.
Never authorize unknown OAuth applications — this story shows how serious the consequences can be.
Periodically review the list of authorized OAuth applications in your GitHub account, and remove any suspicious ones.
We recommend the following to companies:
Use a reliable security solution with phishing protection on all devices, which will warn of dangers and block malicious sites in time.
Conduct regular information security training for employees, including developers. Experience with IT systems doesn’t guarantee safety; the necessary skills must be developed specifically. For example, you can use our interactive educational platform, the Kaspersky Automated Security Awareness Platform.
from Kaspersky official blog https://ift.tt/T1gUM0G
via IFTTT
The modern kill chain is eluding enterprises because they aren't protecting the infrastructure of modern business: SaaS.
SaaS continues to dominate software adoption, and it accounts for the greatest share of public cloud spending. But enterprises and SMBs alike haven't revised their security programs or adopted security tooling built for SaaS.
Security teams keep jamming on-prem pegs into SaaS security holes
The mature security controls CISOs and their teams depended on in the age of on-prem dominance have vanished. Firewalls now protect a small perimeter, visibility is limited, and even if SaaS vendors offer logs, security teams need homegrown middleware to digest them and push into their SIEM.
SaaS vendors do have well-defined security scopes for their products, but their customers must manage SaaS compliance and data governance, identity and access management (IAM), and application controls — the areas where most incidents occur. While this SaaS shared responsibility model is universal among SaaS apps, no two SaaS applications have identical security settings.
Figure 1. In the context of SaaS security concerns, the application provider is responsible for all physical infrastructure, as well as the network, OS, and application. The customer is responsible for data security and identity management. The SaaS shared responsibility model requires SaaS customers to assume ownership of components that threat actors attack most often. Illustration courtesy of AppOmni.
AppOmni research reports that on average, a single instance of SaaS has 256 SaaS-to-SaaS connections, many of which are no longer in use, but still have excessive permissions into core business apps such as Salesforce, Okta, and GitHub, among others.
Between the multitude of different SaaS security settings and constant updates that alter them, security teams can't effectively monitor these connections. The number of entry points multiplies exponentially when employees enable SaaS-to-SaaS (also called "third party" or "machine") connections. Machine identities can use API keys, secrets, sessions, digital certificates, cloud access keys, and other credentials to enable machines to communicate with one another.
As the attack surface migrated outside the network perimeter, so did the kill chain — the way in which threat actors orchestrate the various phases of their attacks.
The modern SaaS kill chain usually involves:
Compromising an identity in the IdP via a successful phishing campaign, purchasing stolen credentials off the dark web, credential strings, credential stuffing, taking advantage of misconfigured SaaS tenants, or similar methods.
Conducting a post-authentication reconnaissance phase. This step is reminiscent of attackers breaking into the corporate networks of yore. But now they're combing through document repositories, source code repositories, password vaults, Slack, Teams, and similar environments to find privileged escalation entry points.
Leveraging their findings to move laterally into other SaaS tenants, PaaS, or IaaS, and sometimes into the corporate infrastructure — wherever they can find the data most valuable to the target organization.
Encrypting the crown jewels or delivering their ransom note, and attempting to evade detection.
Figure 2. Successful SaaS kill chains typically involve four overarching steps: initial access, reconnaissance, lateral movement and persistence, and ransomware execution and security evasion. Illustration courtesy of AppOmni.
Breaking down a real-world SaaS kill chain: Scattered Spider/Starfraud
SaaS security leader AppOmni's latest threat intelligence briefing webinar delineated the kill chain of the Scattered Spider/Starfraud threat actor groups' (affiliates of ALPHV) successful attack on an undisclosed target in September 2023:
A user opened a phishing email that contained links to a spoofed IdP login page, and they unknowingly logged into the fake IdP page.
The threat actor groups immediately called that user and convinced them, through social engineering, to provide their time-based, one-time password (TOTP) token.
After obtaining the user's login credentials and TOTP token, the threat actors tricked the MFA protocol into thinking they're the legitimate user.
While in reconnaissance mode, the threat actors had access to a privileged escalation, enabling them to obtain credentials into Amazon S3, then Azure AD, and finally Citrix VDI (virtual desktop infrastructure).
The threat actors then deployed their own malicious server in the IaaS environment, in which they executed a privileged Azure AD escalation attack.
The attackers encrypted all the data within their reach and delivered a ransom note.
Figure 3. The kill chain used by the Scattered Spider/Starfraud threat actor groups. Illustration courtesy of AppOmni.
Scattered Spider/Starfraud likely accomplished this series of events over several days. When SaaS serves as the entry point, a serious attack can include the corporate network and infrastructure. This SaaS/on-prem connectivity is common in today's enterprise attack surfaces.
SaaS attack activity from known and unknown threat actors is growing
Most SaaS breaches aren't dominating headlines, but the consequences are significant. IBM reports that data breaches in 2023 averaged $4.45 million per instance, representing a 15% increase over three years.
Threat actors are continually relying on the same TTPs and playbook of the Scattered Spider/Starfraud kill chain to gain unauthorized access and scan SaaS tenants, including Salesforce and M365 where configuration issues might be manipulated to provide access later.
Other attackers gain initial access with session hijacking and impossible travel. Once they've transferred the hijacked session to a different host, their lateral movement often involves communications platforms such as SharePoint, JIRA, DocuSign, and Slack, as well as document repositories like Confluence. If they can access GitHub or other source code repositories, threat actors will pull down that source code and analyze it for vulnerabilities within a target app. They'll attempt to exploit these vulnerabilities to exfiltrate the target app's data.
The AppOmni threat intelligence briefing also reports that data exfiltration via permission sharing remains a serious SaaS security concern. This occurs, for example, in Google Workspace when the unauthorized user changes directories to a very open level of permissions. The attacker may share them with another external entity via email forwarding, or changing conditional rules so attackers are included as BCC recipients in a distribution list.
How do you protect your SaaS environments?
1. Focus on SaaS systems hygiene
Establish a SaaS intake and review process to determine what SaaS you'll allow in your company. This process should require answers to security questions such as:
Does all SaaS need to be SOC 2 Type 2 certified?
What is the optimal security configuration for each tenant?
How will your company avoid configuration drift?
How will you determine if automatic SaaS updates will require modifying security control settings?
Ensure you can detect Shadow IT SaaS (or unsanctioned SaaS apps) and have a response program so alerts aren't created in vain.
If you're not monitoring your SaaS tenants and ingesting all of the logs from them in some unified method, you'll never be able to detect suspicious behaviors and receive alerts based on them.
2. Inventory and continuously monitor machine accounts/identities
Threat actors target machine identities for their privileged access and lax authentication standards, often rarely requiring MFA.
In 2023, threat actors successfully targeted and breached major CI/CD tools Travis CI, CircleCI, and Heroku, stealing OAuth tokens for all of these providers' customers. The blast radius expands considerably in these situations.
With the average enterprise containing 256 machine identities, hygiene is often lacking. Many of them are used once or twice and then remain stagnant for years.
Inventory all of your machine identities and triage these critical risks. Once you've mitigated these, create policies that prescribe:
What type of accounts will be granted machine identities, and the requirements these vendors must meet to be granted access.
The time frame for how long their access/tokens are active before they will be revoked, refreshed, or regranted.
How you'll monitor these accounts for their usage and ensure they're still needed if they experience periods of dormancy.
3. Build out a true Zero Trust architecture in your SaaS estate
Zero Trust architecture builds on the principle of least privilege (PLP) with a "never trust, always verify" approach. While Zero Trust has been established in traditional networks, it's rarely achieved in SaaS environments.
Zero Trust Network Access (ZTNA)'s network-centric approach cannot detect misconfigurations, machine integrations, or unwanted user access entitlements within and to SaaS platforms, which can have thousands or even millions of external users accessing data.
Zero Trust Posture Management (ZTPM), an emerging SaaS security tool, extends Zero Trust to your SaaS estate. It bridges the SaaS security gap that SASE creates by:
Preventing unauthorized ZTNA bypass
Allowing for fine-tuned access decisions
Enforcing your security policies with continuous feedback loops
Extending Zero Trust to machine integrations and cloud connections
With SSPM, ZTPM, and a SaaS security program in place, your team will gain the visibility and intelligence it needs to identify intruders in the low-risk stages of your kill chain — and stop them before a breach becomes devastating.
Found this article interesting? This article is a contributed piece from one of our valued partners. Follow us on Twitter and LinkedIn to read more exclusive content we post.
from The Hacker News https://ift.tt/owxjhuQ
via IFTTT
Jun 28, 2024NewsroomNetwork Security / Data Protection
A group of security researchers from the Graz University of Technology have demonstrated a new side-channel attack known as SnailLoad that could be used to remotely infer a user's web activity.
"SnailLoad exploits a bottleneck present on all Internet connections," the researchers said in a study released this week.
"This bottleneck influences the latency of network packets, allowing an attacker to infer the current network activity on someone else's Internet connection. An attacker can use this information to infer websites a user visits or videos a user watches."
A defining characteristic of the approach is that it obviates the need for carrying out an adversary-in-the-middle (AitM) attack or being in physical proximity to the Wi-Fi connection to sniff network traffic.
Specifically, it entails tricking a target into loading a harmless asset (e.g., a file, an image, or an ad) from a threat actor-controlled server, which then exploits the victim's network latency as a side channel to determine online activities on the victim system.
To perform such a fingerprinting attack and glean what video or a website a user might be watching or visiting, the attacker conducts a series of latency measurements of the victim's network connection as the content is being downloaded from the server while they are browsing or viewing.
It then involves a post-processing phase that employs a convolutional neural network (CNN) trained with traces from an identical network setup to make the inference with an accuracy of up to 98% for videos and 63% for websites.
In other words, due to the network bottleneck on the victim's side, the adversary can deduce the transmitted amount of data by measuring the packet round trip time (RTT). The RTT traces are unique per video and can be used to classify the video watched by the victim.
The attack is so named because the attacking server transmits the file at a snail's pace in order to monitor the connection latency over an extended period of time.
"SnailLoad requires no JavaScript, no form of code execution on the victim system, and no user interaction but only a constant exchange of network packets," the researchers explained, adding it "measures the latency to the victim system and infers the network activity on the victim system from the latency variations."
"The root cause of the side-channel is buffering in a transport path node, typically the last node before the user's modem or router, related to a quality-of-service issue called bufferbloat."
The disclosure comes as academics have disclosed a security flaw in the manner router firmware handles Network Address Translation (NAT) mapping that could be exploited by an attacker connected to the same Wi-Fi network as the victim to bypass built-in randomization in the Transmission Control Protocol (TCP).
"Most routers, for performance reasons, do not rigorously inspect the sequence numbers of TCP packets," the researchers said. "Consequently, this introduces serious security vulnerabilities that attackers can exploit by crafting forged reset (RST) packets to maliciously clear NAT mappings in the router."
The attack essentially allows the threat actor to infer the source ports of other client connections as well as steal the sequence number and acknowledgment number of the normal TCP connection between the victim client and the server in order to perform TCP connection manipulation.
The hijacking attacks targeting TCP could then be weaponized to poison a victim's HTTP web page or stage denial-of-service (DoS) attacks, per the researchers, who said patches for the vulnerability are being readied by the OpenWrt community as well as router vendors like 360, Huawei, Linksys, Mercury, TP-Link, Ubiquiti, and Xiaomi.
Found this article interesting? Follow us on Twitter and LinkedIn to read more exclusive content we post.
from The Hacker News https://ift.tt/UXm5TKR
via IFTTT
SSL leverages both labeled and unlabeled data to train a single model. Often, people use SSL to build a classifier (i.e., a model that decides for each sample what class it belongs to from a predefined set of classes).
In this context, a labeled sample means we know in advance what class that sample belongs to, and unlabeled means we do not. However, we can often still extract useful information from the unlabeled data to build a better classifier as indicated in Figure 1. That is what SSL algorithms are designed to do.
Figure 1. Ideally, a model trained with additional unlabeled data should outperform a model trained only with labeled data.
However, it’s not uncommon for a model trained with SSL to perform worse than one trained only on labeled data (i.e., fully supervised).
Figure 2. A typical SSL workflow. The labeled and unlabeled datasets are often sourced from distinct distributions.
As illustrated in Figure 2, a common reason for this is that the labeled and unlabeled datasets often have distinct properties. They are often sampled from different sources (i.e., distributions).
For example, labeled datasets are typically collected manually offline by practitioners and annotators. Unlabeled data, on the other hand, typically comes from the same source you wish to deploy your model on in the real world.
One of the core motivations of SSL is aligning models to real-world distributions that are too plentiful or messy to label. Curated labeled datasets often take on distinct characteristics from unlabeled data.
By the nature of being unlabeled, the relative frequency of classes in real-world data is typically unknown or even unknowable. Sometimes, unlabeled data is unviewable due to privacy concerns or in the deployment of fully autonomous systems.
More examples of data quality issues are as follows:
Concept drift within classes (e.g., change in the prototypical example of a class).
Unlabeled data containing data that belongs to no class
Errors in the given labels
SSL algorithms are seldom equipped to handle these quality issues, especially combinations thereof. In literature, this often goes unnoticed as, in many works, the sole experimental variable is the number of labels given on otherwise clean and balanced academic datasets.
Our research question is this: can we build an SSL algorithm whose primary objective is to match or outperform a fully supervised baseline for any dataset?
Core Algorithm Components
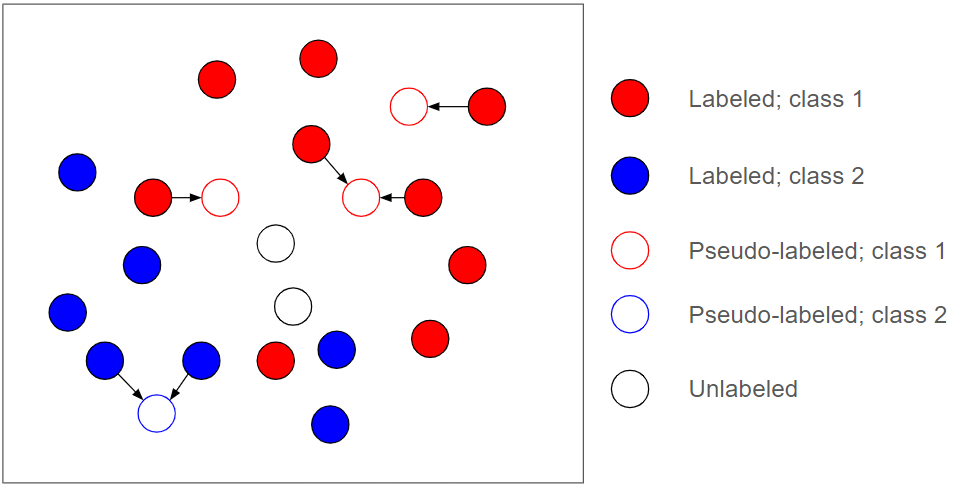
SSL comes in many flavors. A common, powerful approach is to generate and leverage what are known as pseudo-labels for unlabeled data during training. Illustrated in Figure 3, pseudo-labels are (often soft) labels produced dynamically for unlabeled data during training that are then used as new supervision sources for further training.
In the best-case scenario, if all pseudo-labels are correct, it can be as powerful as if all the unlabeled data were labeled. This is, of course, unrealistic.
It's common for the true class of unlabeled data to be indiscernible from the given label information. This means pseudo-labels will inevitably have errors, which is why pseudo-label approaches are also inherently dangerous. SSL algorithms, especially those implemented with deep neural networks, tend to be very sensitive to these errors in pseudo-supervision.
Figure 3. Pseudo-labels (faint outlines) are produced for unlabeled samples in a batch of data. The pseudo-labels for the two remaining unlabeled samples are more ambiguous.
To approach our research question, we start with a simple assumption: pseudo-label errors are the root cause of SSL algorithms failing to match or outperform a fully supervised baseline. Intuitively, without those errors, an algorithm should have no issue at least matching the fully supervised baseline.
CCP is designed around this principle. Specifically, we aim to build an SSL algorithm that is foremost robust to the pseudo-label errors that it inevitably produces.
There is an important distinction between class-conditional label noise and instance-dependent label noise. Instance-dependent label noise refers to the type of noise where the probability of label errors depends on the specific characteristics (features) of the instance.
Class-conditional label noise, on the other hand, refers to label errors that are dependent on the true label. Pseudo-label noise is highly instance-dependent as each pseudo-label is generated dynamically on a sample-by-sample basis. This narrows down our search further.
A powerful method previously demonstrated on fully supervised problems is called a self-evolution average label also known as SEAL. The main idea is to train a model with noisy labels and to produce new predictions for every data sample multiple times throughout the training process. You then average those predictions together to produce the next set of labels you’ll use in the next iteration. This works because, in the presence of an incorrect label, your model will often oscillate its prediction between the correct and incorrect class before it typically memorizes the incorrect class late in training.
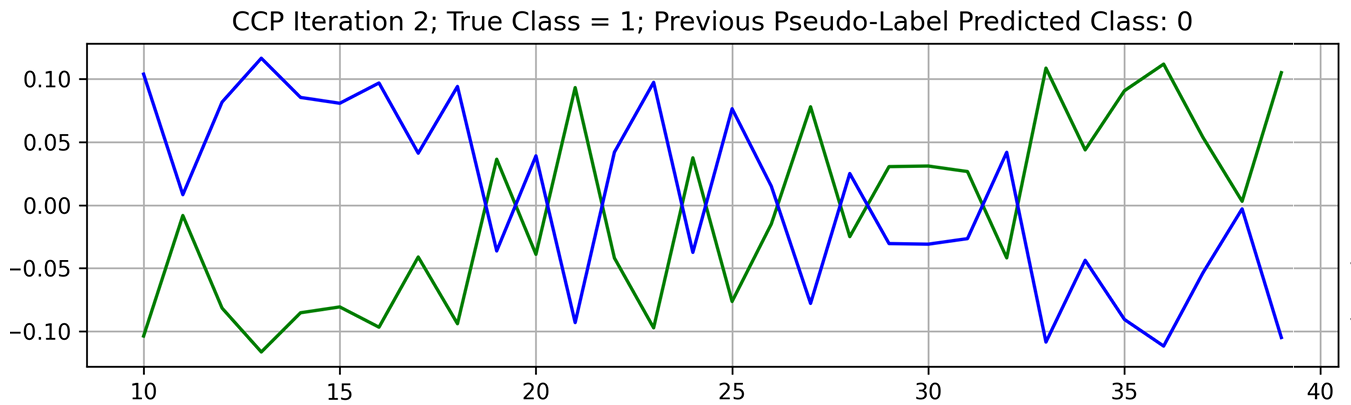
Averaging those predictions across time slowly pushes the label in the right direction. A similar pattern in pseudo-label oscillations was observed in our study. An example of pseudo-label oscillation is shown in Figure 4.
Figure 4. Pseudo-label predictions oscillate between classes throughout training. The blue (green) line depicts the score for class 1 (0). Source: Palo Alto Networks, AI Research.
Early in training, when the model has not overfitted to the wrong label, the score for the true class is high. This is reversed when the model has time to fit itself to the wrong label.
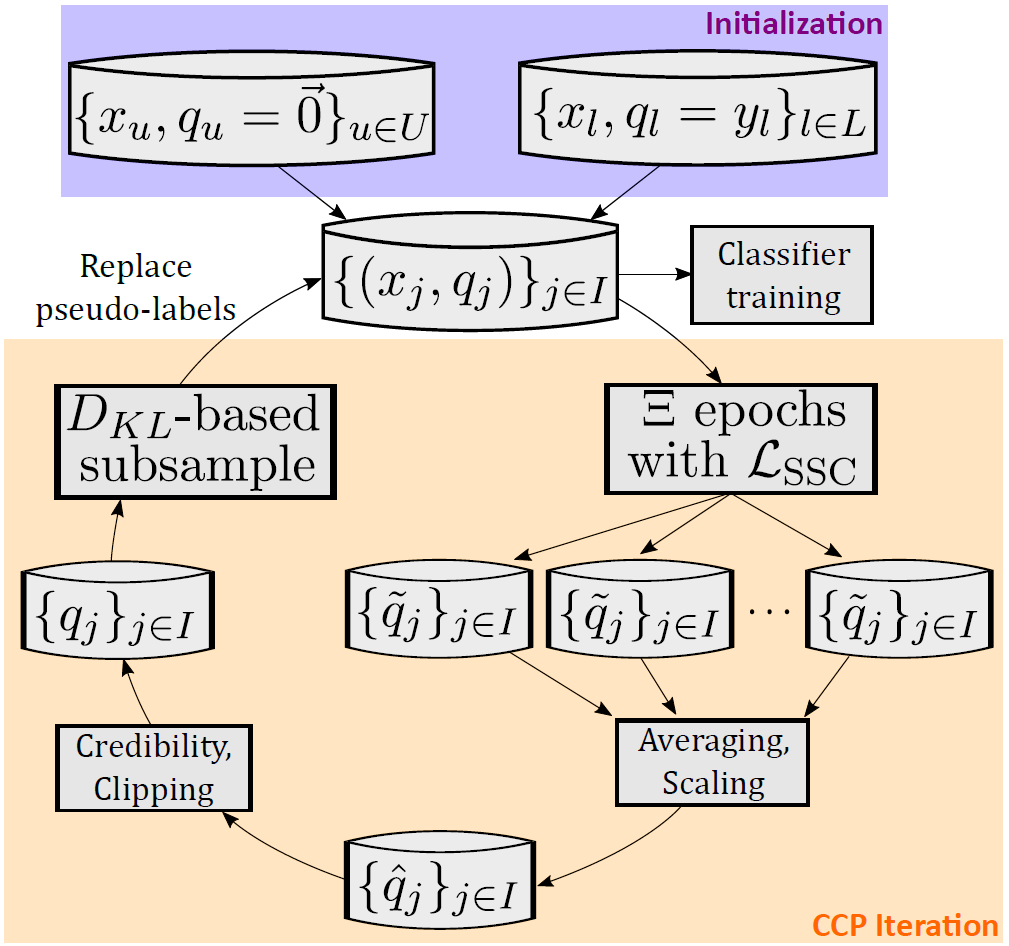
CCP features an outer loop designed to exploit this phenomenon, illustrated in Figure 5. For every batch of data during training, we predict new pseudo-labels for unlabeled data, then average them together to mark the end of an iteration.
Figure 5. High-level view of the CCP algorithm. An outer loop iteratively refines a set of pseudo-labels (expressed as credibility vectors) before they are used to build a classifier. Source: Palo Alto Networks, AI Research.
These “CCP iterations,” designed to refine pseudo-labels iteratively, take place strictly before a classifier is ever built. The pseudo-labels are generated transductively, meaning we infer each sample based only on other samples in the batch.
Classifiers are inductive and try to learn generalizable patterns across all data. Importantly, these noisy, batch-level, transductive pseudo-labels are never directly used to supervise our inductive classifier. We clean the pseudo-labels through iterative refinement first.
Credibility Representations
As mentioned previously, it's common for the true class of unlabeled data to be indiscernible from the given label data. This may be due to ambiguity or gaps in the label information.
We’d ideally like to discard pseudo-label information for those samples or otherwise nullify their impact on learning. We adopt a label representation called “credibility vectors” that allows us to do the former.
Traditionally, label vectors are computed via a softmax function. This function transforms a vector of real values (class scores or similarities) into a vector of values all in the range [0, 1] that sums to such that they can be interpreted as probabilities.
The function preserves the ranking of values (i.e., small input values will correspond to small output values and vice versa. Credibility transforms an input vector of class scores/similarities with range [0, 1] into an output vector with range [-1, 1].
In a credibility vector, -1 corresponds to high confidence in class dissimilarity, 0 corresponds to no confidence either way and 1 corresponds to high confidence in class similarity. The core idea of credibility is to condition class similarity measurements on the next highest class similarity (i.e., a large class similarity measure only remains high if no other class similarity measures are also large).
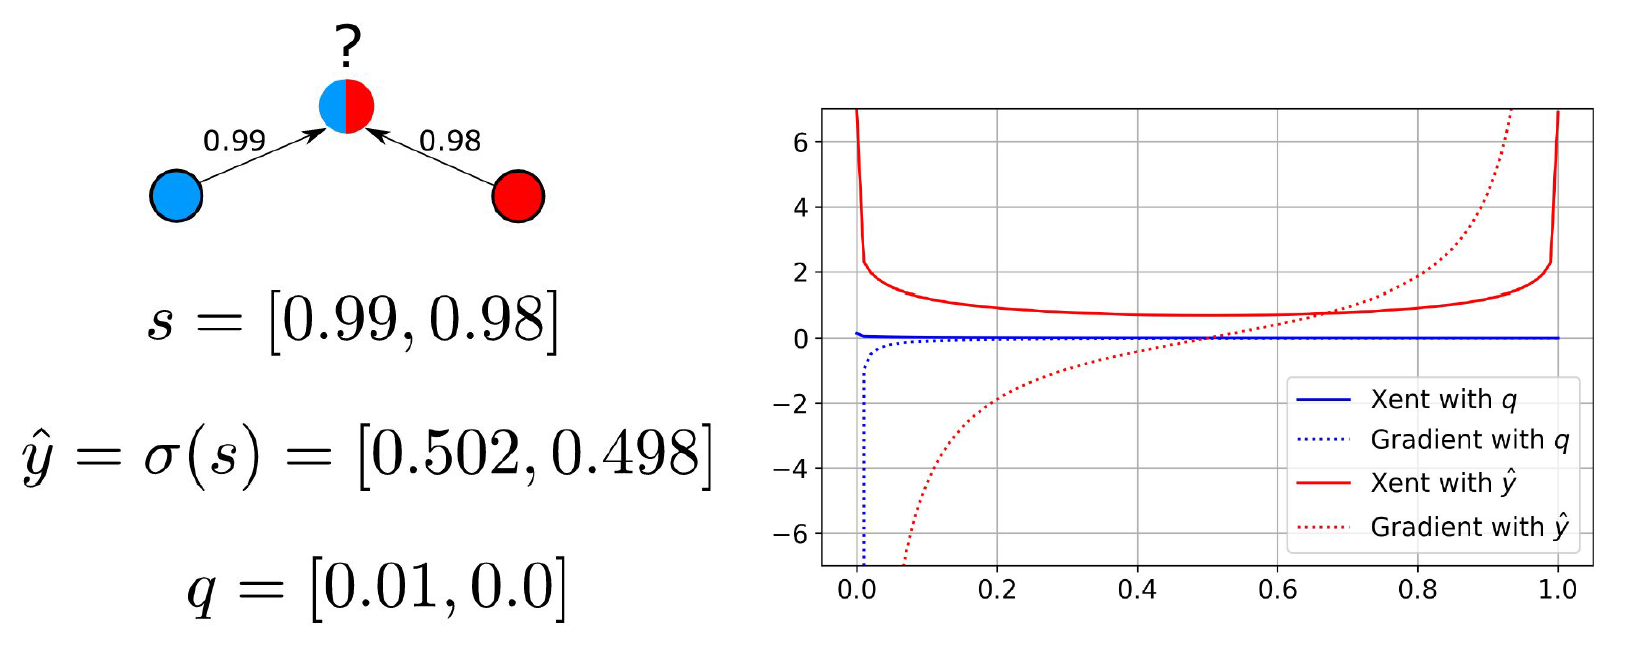
Consider the example in Figure 6.
Figure 6. Left: An unlabeled sample is nearly equally similar to the red and blue classes. From top to bottom: the similarity vector, a softmax label and a credibility label. Right: Cross-entropy classification loss and its gradient when supervised with the softmax (red) and credibility labels (blue). Source: modified from Palo Alto Networks, AI Research.
On the left of Figure 6, we see an unlabeled sample with large class similarity scores of 0.98 and 0.99 to the red and blue classes, respectively. The true label is nearly ambiguous. The softmax label is computed as [0.502,0.498]. The credibility vector is computed as 0.99-0.98=0.01 in the first entry and 0.98-0.99=-0.01 in the second entry (which is clipped to 0).
In SSL, these pseudo-labels are often used to supervise an underlying model with a classification loss. We can see the effect of using each on the standard classification loss function called cross-entropy (Xent) on the right of Figure 6.
In that plot, consider the X-axis the softmax output of a binary classifier for the blue class. Computing cross-entropy with the softmax label induces a strong gradient at either pole despite the true class being nearly ambiguous.
Using the credibility label will ensure the gradient for this sample is near 0 everywhere except for . Where all classes are equally similar, the credibility label would be the zero vector and the gradient would be zero everywhere. This representational capacity is important because we often view incorrect pseudo-labels improving through CCP iterations sometimes just by shrinking in magnitude (e.g., when the true class is indiscernible).
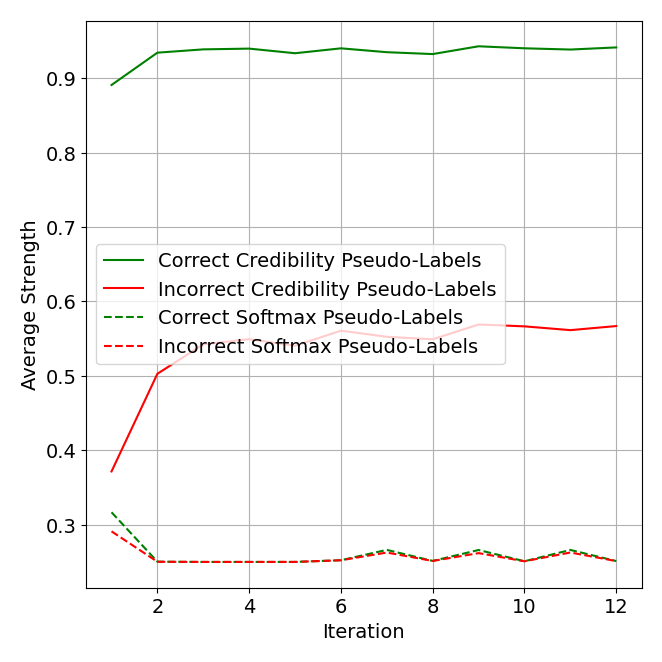
In an ablation analysis in Figure 7, we see a key benefit of credibility representations is differentiating correct versus incorrect pseudo-labels. On average, the strength (maximum value) difference between correct and incorrect pseudo-labels is much greater when using credibility. This is likely due to its more strict criteria for assigning large scores. It is thus a better measure of confidence.
The entire CCP framework, from pseudo-label refinement to classifier building, makes native use of credibility and the better differentiation it provides. Through weighted averages, a sample’s impact on label propagation and all loss functions scales linearly with the magnitude of the single non-zero entry of a credibility label. Zero vectors also provide a natural initialization for pseudo-labels in the first CCP iteration.
Figure 7. A representative example of the average strength of correct and incorrect pseudo-labels when using softmax and credibility.
Subsampling
Figure 7 suggests that the strength of credibility labels is effective at identifying pseudo-labels that are incorrect. Naturally, one may ask if we can use this signal to refine the pseudo-labels during CCP iterations further. We define a subsampling procedure that does just this.
This procedure is optional, but it does help speed up convergence and even converge at better solutions with generalizable settings. At the end of an iteration, we compute a percentage of the weakest pseudo-labels to reset back to their initialization (the zero vector). This allows the network to train on a cleaner pseudo-label set for the next iteration. Reset pseudo-labels will be assigned a new pseudo-label in the next iteration.
What percent of the weakest pseudo-labels should we reset? Resetting too many pseudo-labels can lead to instability in training (i.e., the accuracy of pseudo-labels dropping rapidly or failing to converge across iterations).
We hypothesize that the cause of this instability is similar to the cause of instability observed with self-training techniques. Self-training is the concept of iteratively assigning unlabeled data pseudo-labels and moving them (usually the strongest ones) into the train set. Many state-of-the-art SSL algorithms can be categorized as a form of self-training.
Here, we are resetting existing pseudo-labels that would otherwise be kept. So, in a sense, it’s the inverse of self-training.
A unique strength of CCP is that it is highly stable without subsampling (a theoretical explanation for this is provided in the paper). This awards us a path to balance stability with the desire to reset incorrect pseudo-labels. We consider a wide range of candidate subsampling percentages of the weakest pseudo-labels to reset.
We first compute a probability distribution over classes that summarizes the state of all pseudo-labels in totality (sum them together then divide by the total mass). This serves as our anchor distribution – it's what we want to limit the divergence from.
For each candidate subsampling percentage, we compute a summarizing probability distribution over the pseudo-labels again after resetting the weakest corresponding percent of pseudo-labels. We then have a new summarizing probability distribution for each candidate subsampling percentage.
We compute the Kullback-Leibler divergence (the difference in information between probability distributions) of each candidate distribution from the anchor distribution. These divergence measures represent how much the summarizing probability distribution changes when increasing the candidate subsampling percentage.
To finish subsampling, we simply choose the highest candidate subsampling percentage that obeys a strict limit on the divergence and then apply that to our pseudo-labels. We slowly decrease the strict cap on divergence through CCP iterations to support convergence.
Importantly, this method is free of imposing assumptions and normalized to the dataset size. Accordingly, a single subsampling schedule generates well across all of our experiments.
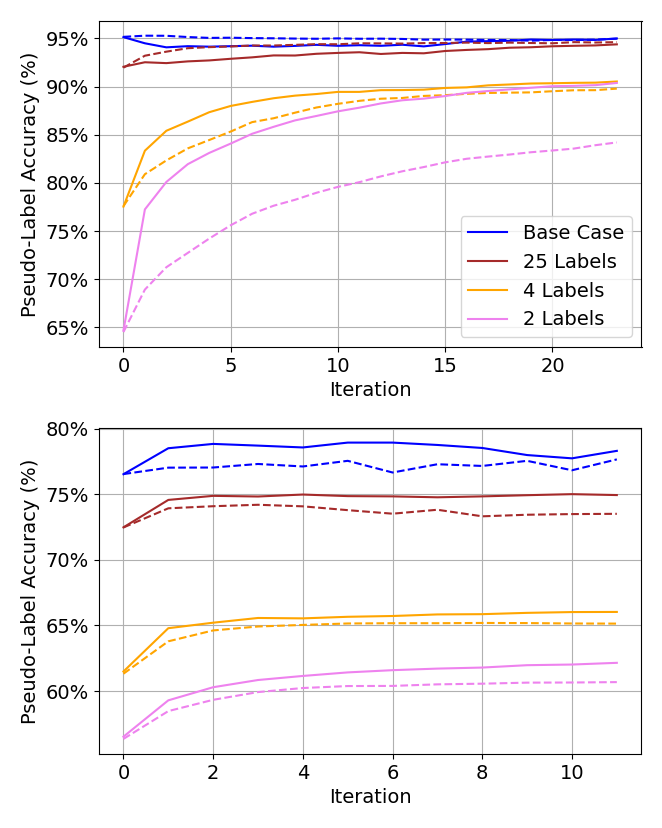
Examples of an ablation study on subsampling are shown in Figure 8. Specifically, we see the state of pseudo-labels converge faster and the overall accuracy of pseudo-labels increase upon convergence.
Figure 8. Representative examples of the effect of subsampling on pseudo-label accuracy and convergence through CCP iterations. Dotted (solid) lines correspond to subsampling turned off (on). Source: Palo Alto Networks, AI Research.
Experimental Results
Our paper has a comprehensive overview of all our experimental results. We enumerate five different kinds of data quality issues (data variables) and then measure the sensitivity of five state-of-the-art SSL algorithms to these data variables.
Sensitivity refers to how big of an impact a data variable has on the results of an SSL algorithm. The five data variables in question are:
Few-shot: Changing the scarcity of labeled data.
Open-set: Changing the percentage of unlabeled data that belongs to no class.
Noisy-label: Changing the percentage of given labels that are incorrect.
Class imbalance/misalignment: Changing the class frequency distributions in the labeled and unlabeled sets separately (while the other remains balanced).
Each algorithm tested was optimized for a single, specific data variable. However, as we argue here, a practitioner rarely knows in advance what data variables they need to overcome. There is thus a gap in the practical usefulness of narrowly optimized methods.
We explore each data variable at three levels of severity. We construct our data variable scenarios by applying corruptions to two standard benchmark computer vision datasets (CIFAR-10 and CIFAR-100). In addition to our SSL algorithms, we train a supervised baseline in every scenario.
In brief, CCP is not the optimal solution for every scenario, but it demonstrates remarkable consistency. For example, it is the only algorithm outperforming the supervised baseline in every scenario.
We discovered one or more scenarios that result in catastrophic performance degradation for every other algorithm. This is shown in Table 1, which distills the minimum accuracy of each algorithm on our two datasets across all scenarios.
Table 1. Minimum accuracies for each algorithm across all scenarios for both datasets.
CCP Applied to DLP
DLP is a critical cybersecurity task aimed at monitoring sensitive data within an organization and preventing its exfiltration. ML-powered DLP services feature models that must autonomously classify if a given document is sensitive or not sensitive. Often, models must also determine what kind of sensitive data lies within the document (e.g., financial, health, legal or source code).
For this demo, we apply CCP to a similar deep learning DLP classifier. To simplify, we assume the input document contains only text. However, CCP applies to any model tasked with ingesting documents of any modality. The demo document classifier recognizes multiple sensitive document classes and one non-sensitive class.
A practitioner faced with building such a classifier must overcome some fundamental challenges. By definition, the data you’d like to classify in deployment is unviewable due to privacy concerns.
Labeled datasets to train, test and validate a classifier must be gathered with publicly available versions of sensitive documents or custom synthetic samples. Both of those efforts are useful, but, in any non-trivial deployment scenario, there will inevitably be a large information gap between labeled data and production data.
The class frequency and content frequency distributions may vary widely. Also, new types of content for a given class may be present in production data but not in your labeled dataset. Naturally, the desire to train on real production data arises.
The rough sketch of applying CCP to a DLP classifier is as follows:
We define a means to extract privatized versions of unlabeled sensitive production data
We attach the lightweight architectural components necessary to compute CCP’s algorithms and losses to the existing classifier
We repeat CCP iterations to iteratively refine a set of pseudo-labels for all the unlabeled data
We use a combination of given labels and the final state of pseudo-labels to train a final inductive classifier
Working with Sensitive Data While Preserving Privacy
A comparative discussion of these techniques is out-of-scope for this blog. We instead detail how one can use a combination of DP and CCP to train on production data in a privacy-preserving yet effective manner.
To understand DP, consider the following. Imagine you’re in a classroom and you have a secret – your favorite food is broccoli, but you don't want anyone to know. Now, suppose your teacher is taking a survey of everyone's favorite food in class. You don't want to lie, but you also don't want anyone to know your secret. This is where DP comes in.
Instead of telling your true favorite food, you decide to flip a coin. If it's heads, you tell the truth. If it's tails, you pick a food at random.
Now, even if your teacher says “someone in class likes broccoli,” no one will know for sure it's you, because it could have been a random choice. DP works similarly. It adds a bit of random "noise" to the data. The noise is enough to keep individual information private, but not so much that the overall trends in the data can't be seen.
Your teacher can still get a general idea of the class's favorite foods, even if they don’t know that you secretly love broccoli. The key aspect here is that by introducing the coin flip (or randomness), you're adding an element of plausible deniability.
Even if someone guessed that you chose broccoli, the coin flip introduces doubt, protecting your privacy. In the context of DLP document classification, we use DP to preserve the privacy of production documents while mostly preserving the general statistics of a large collection of documents.
We need a real-valued representation of the document to apply DP noise to and achieve its theoretical privacy guarantees. A special feature extraction model is typically used for this purpose. Its job is to non-reversibly convert a text document into a large collection of floating point numbers.
This representation is unreadable by a human but preserves the high-level semantics of the document (an additional layer of privacy). Industry-standard levels of DP noise are added to this floating point representation to ensure the representation can be safely extracted from production data.
Despite having privatized representations of sensitive documents, you must still overcome the fact that the representations are unlabeled. This is where CCP comes into play.
Neural Architecture Details
Our deep learning model takes in privatized representations of documents as input. Its task is to output the correct classification verdict for each input sample.
CCP also requires us to define a separate embedding space within which we will learn a similarity function that compares inputs. The similarity function will be trained to assign inputs of the same class with higher similarity than inputs of different classes.
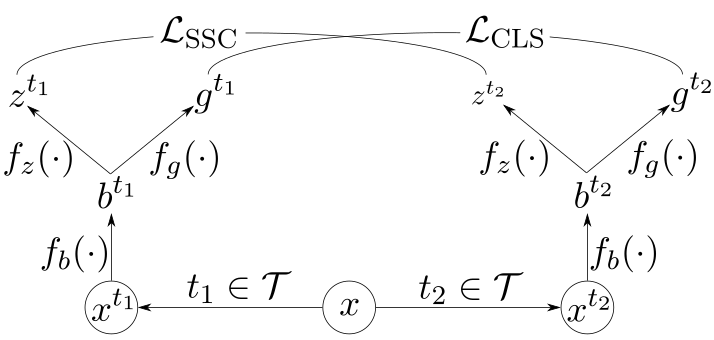
This similarity function is trained with a contrastive loss allowing us to produce pseudo-labels transductively. The core architecture components of CCP are illustrated in Figure 9.
Figure 9. High-level illustration of the core architecture components of CCP.
The notation in Figure 9 is as follows:
– An input sample
– The set of transformations
– A randomly sampled transformation
– The encoder network
– The contrastive projection head
– The classification projection head
– Softly supervised contrastive loss
– Standard cross-entropy classification loss
Firstly, in line with other work on contrastive learning, we define a set of transformations, , over our data. The job of transformations is to corrupt the low-level details of an input while preserving its high-level class semantics.
For images, this could be random crops or color jitter. For text, this could be noise added to the embedding vectors or randomly hiding words.
Randomly drawing two transformations leads to two views of each input sample with the same class label. These transformations help the learned similarity metric and the classifier robustly overcome low-level noise.
An encoder network, , processes the transformed batch of data. The encoder’s job is to transform the input into a new encoded vector space.
The exact structure of (a CNN, transformer, RNN, etc) depends only on what makes sense for your datatype. A transformer would be a common choice for DLP and natural language documents.
Two projection heads ( and ) bring the encoder outputs into two new vector spaces upon which we compute our loss functions. Each projection head is a multilayer perceptron (i.e., a short sequence of fully connected layers).
Concerning an existing deep learning DLP classifier, would be the last layer of your classifier (upon which you compute softmax and your classification loss) while would be everything prior. The projection head, used to learn a similarity metric, would be the only new neural network component to add.
Learning and Applying a Similarity Metric
The algorithms and losses unique to CCP are computed within the vector space defined by . We define a novel contrastive loss to learn the similarity metric that is softly supervised.
Two popular contrastive loss functions are SimCLR and SupCon, which can be interpreted as unsupervised and supervised versions of the same loss. Both loss functions assume that positive and negative pairs are sampled discretely (pairs that should be similar and dissimilar, respectively). This is not the case when we have soft pseudo-labels. We only have variable confidence of positive pair relationship defined by the magnitude of the pseudo-label vector.
We describe a generalization of SimCLR and SupCon designed to work with this uncertainty, denoted . Our study shows that SimCLR and SupCon losses are special cases of .
Following the formalization of the algorithm visualized in Figure 5, we repeat the cycle of propagating pseudo-labels with this learned similarity metric followed by averaging pseudo-labels across epochs. We apply subsampling as defined above as necessary.
Once the process has converged, we use the final state of pseudo-labels to train a new inductive classifier consisting of and . In practice, retaining to compute during classifier training as an additional loss provides a classification performance boost. However, during inference, is discarded.
Impact
We outline above the steps to train a DLP classifier on a combination of a curated labeled dataset and unlabeled, privatized production data with CCP. By doing so, you’ve made an important step toward aligning your machine learning model with your target production data distribution.
Despite achieving similarly high test set classification performance in internal experiments, DLP classifiers adjusted with CCP saw a 250% increase in successful detections of sensitive documents in a real-world test. This underscores the critical importance of ensuring the alignment of your ML models to the actual deployment data distributions. Traditional performance metrics on a test split of your curated dataset can sometimes be very misleading!
CCP provides a useful tool for practitioners to confidently align models when the deployment data distribution is unlabeled or even unviewable. DLP is just one experimental setting. CCP is general enough to provide value for any classifiers built on any partially labeled dataset.