Vault is a secrets management platform that provides encrypted storage for long lived secrets, identity brokerage using ephemeral credentials, and encryption as a service. Unless you’re using HashiCorp Cloud Platform to host Vault (which is always recommended if you can support it), deploying and running Vault clusters will likely be a manual process. Any time a server needs to be restarted, an engineer would need to login and restart the service.
This is what orchestrators like HashiCorp Nomad and Kubernetes were built to automate. While Kubernetes has a wide array of components to manage additional use cases, Nomad is mainly focused on scheduling and cluster management. It’s simple to run, lightweight, and supports running VMs, containers, raw executables, JAR files, Qemu workloads, and more with custom task driver plugins. By running Vault as a Nomad job (Nomad’s term for workloads), operators can manage and schedule Vault servers with a low-complexity architecture.
This post shows how to deploy and configure Vault servers on Nomad using HCP Terraform. The secrets consumption will be done using the Nomad and Vault CLI’s, respectively, to show the underlying workflows. The Terraform code will be split in two, with separate configuration for the infrastructure and the Vault deployment. This is done to manage the states for these workspaces separately and share dependency outputs between them.
Deployment architecture
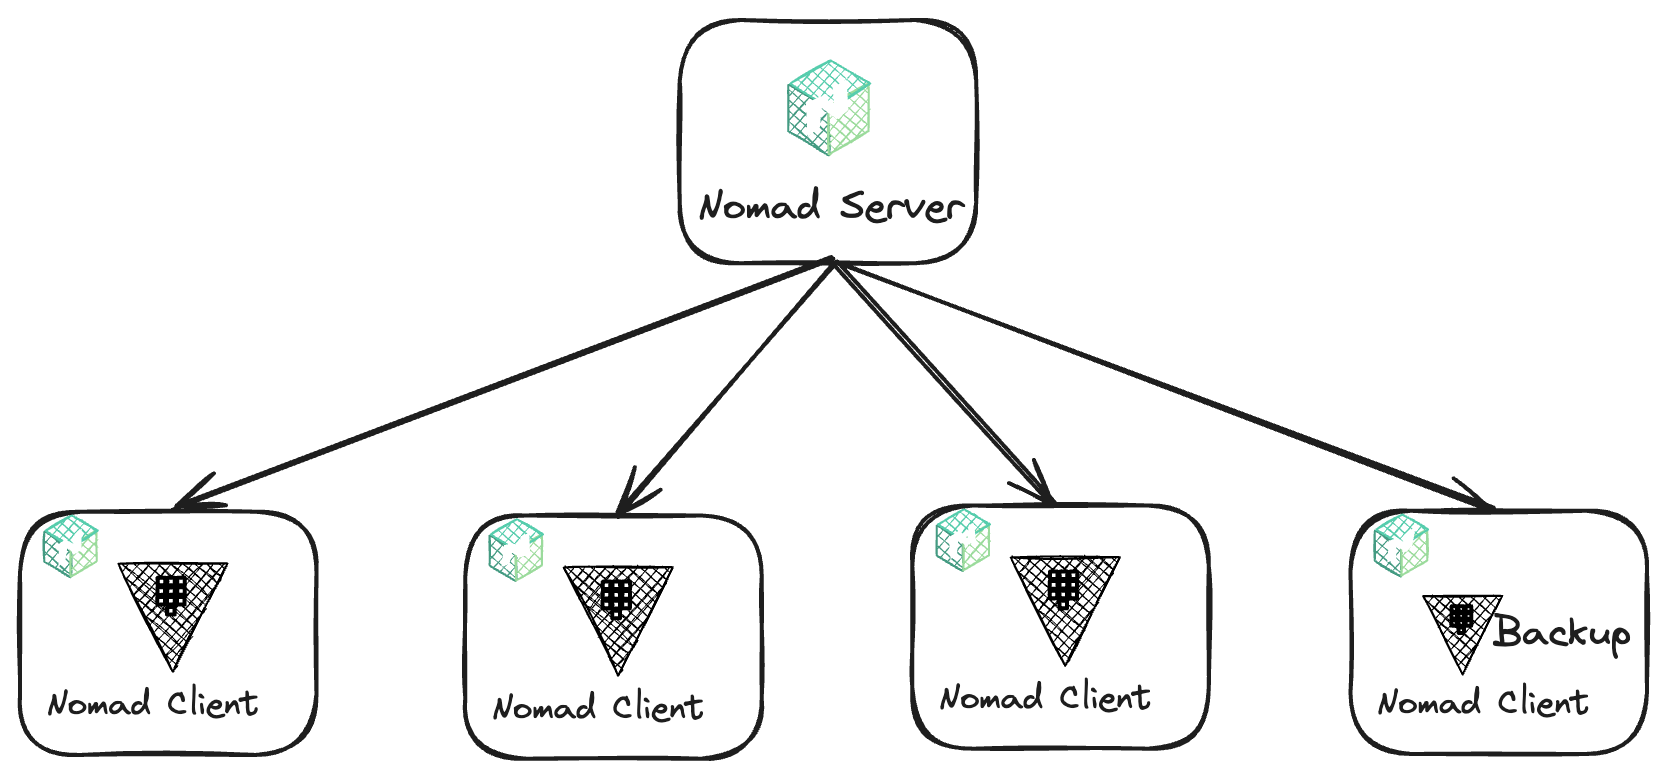
This deployment architecture requires five virtual machines (VMs) — one is the Nomad server, and the other four are the Nomad clients that run the Vault servers, including a backup server for Vault. These VMs will be deployed to Amazon EC2 instances. The VMs will all live in the same virtual private cloud (VPC) subnet.
HCP Terraform and directory setup
Because this approach splits the architecture into multiple workspaces, you need to configure remote backends for each HCP Terraform workspace so that output dependencies can be shared between them. To create these workspaces, create a directory structure that contains a folder for each workspace. The directory structure should look like this:
├── 1-nomad-infrastructure
├── 2-nomad-configuration
├── 3-nomad-example-job-deployment

3 directories
The remote backend is HCP Terraform. To create the remote backends, create a file called backend.tf in each of the directories. Here is a shell script that will create the directory structure and write the relevant backend.tf files in all of the directories.
Networking for the Nomad cluster
To create the infrastructure for Nomad, navigate to the 1-nomad-infrastructure directory. First, set up your AWS Terraform provider. Here is the provider.tf code.
Once the provider is configured, you’re ready to deploy a VPC and a subnet. To do this, there is another file in the same directory, called network.tf, which contains the code below:
module "vpc" {
  source = "terraform-aws-modules/vpc/aws"

  name = "my-vpc"
  cidr = "10.0.0.0/16"

  azs             = ["eu-west-1a"]
  private_subnets = ["10.0.1.0/24", "10.0.2.0/24", "10.0.3.0/24"]
  public_subnets  = ["10.0.101.0/24", "10.0.102.0/24", "10.0.103.0/24"]

  enable_nat_gateway = true
  enable_vpn_gateway = false
  enable_dns_support = true
  enable_dns_hostnames = true

  tags = {
    Terraform = "true"
    Environment = "dev"
  }
}
This code deploys all the resources required for a fully functional network, including resources for a working AWS VPC, associated subnets, and NAT gateways. It uses the community Terraform module called the AWS VPC Terraform module, available on the Terraform Registry.
Configuration of Nomad servers
Before you can write the Terraform code to deploy the five VMs, you need to write some shell scripts to configure the servers during their deployment as a prerequisite. The first is for the Nomad server called nomad-server.sh:
#! /bin/bash -e

# Install Nomad
sudo apt-get update && \
  sudo apt-get install wget gpg coreutils -y

wget -O- https://apt.releases.hashicorp.com/gpg | sudo gpg --dearmor -o /usr/share/keyrings/hashicorp-archive-keyring.gpg
echo "deb [signed-by=/usr/share/keyrings/hashicorp-archive-keyring.gpg] https://apt.releases.hashicorp.com $(lsb_release -cs) main" | sudo tee /etc/apt/sources.list.d/hashicorp.list
sudo apt-get update && sudo apt-get install nomad -y

# Create Nomad directory.
mkdir -p /etc/nomad.d


# Nomad configuration files
cat
from HashiCorp Blog https://ift.tt/OjRYl5W
via IFTTT
No comments:
Post a Comment