Part 1 of this blog series, demonstrated how to deploy the infrastructure for a single Nomad server and four Nomad clients. In this installment of the blog series, you will deploy and configure HashiCorp Vault as a Nomad job.
Deployment overview
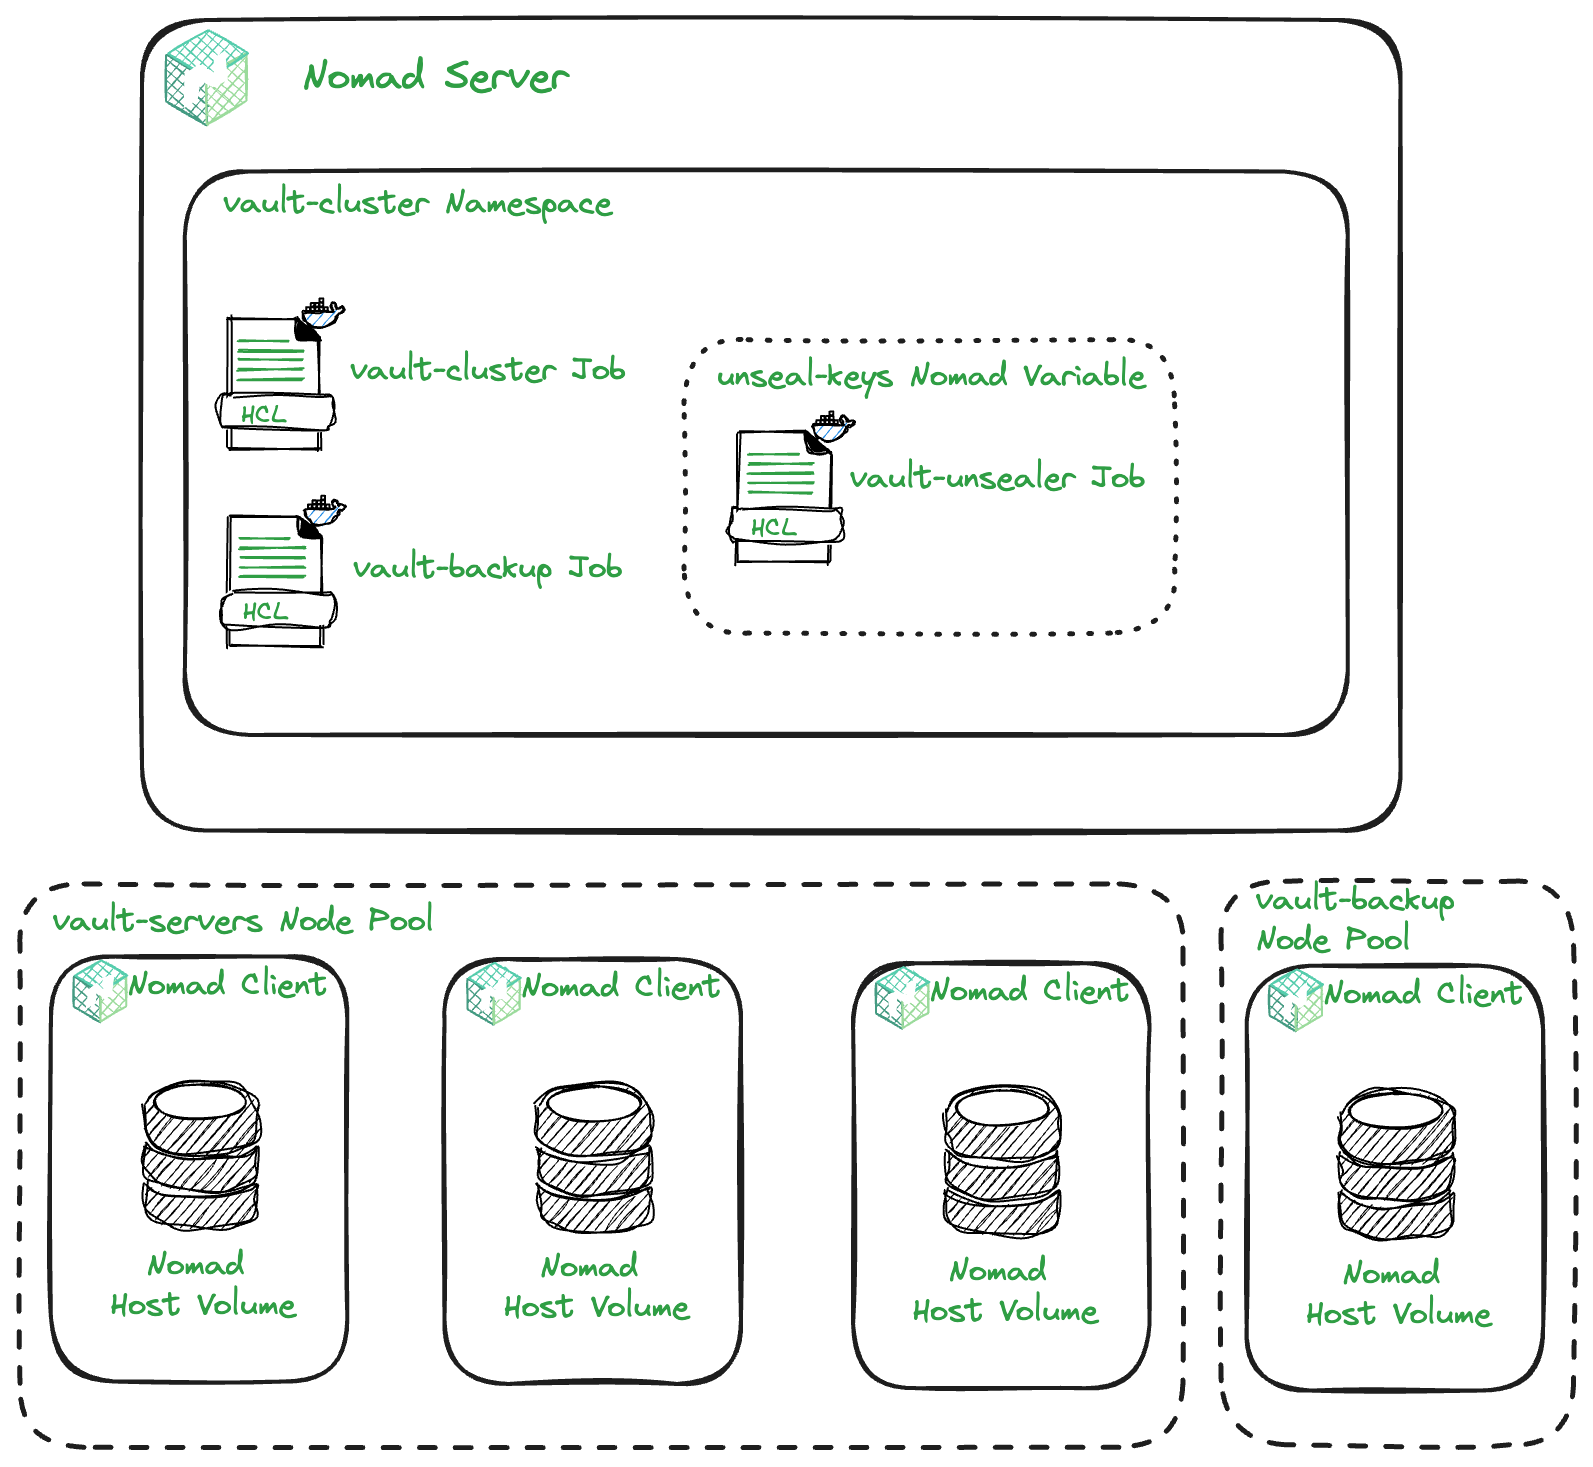
The diagram above gives an overview of how the Nomad jobs will be deployed and some of the Nomad features you will use to enable this. In total, there will be three Nomad jobs deployed to a Vault cluster namespace. However, this installment will focus on the Vault server cluster. Everything will be deployed using Terraform. In this installment, you will be working in the 2-nomad-configuration directory of the Vault on Nomad demo GitHub repository.
Reading outputs from remote state
The infrastructure deployed using Terraform in part 1 of this blog series included some outputs that you need to deploy Vault as a Nomad job. These outputs are:
-
nomad_clients_private_ips -
nomad_clients_public_ips -
nomad_server_public_ip -
terraform_management_token
In order to read the values of these outputs, you can use the Terraform remote state data source to configure the Terraform provider for Nomad.
data "terraform_remote_state" "tfc" {
 backend = "remote"
 config = {
   organization = "org name"

   workspaces = {
     name = "1-nomad-infrastructure"
   }
 }
}
The code above points to the Terraform workspace from part 1 of the series: 1-nomad-infrastructure. This means you can access outputs from that workspace within this post’s workspace: 2-nomad-configuration. The full code example of how you use this to configure the provider can be found here.
Nomad namespaces
Nomad has the concept of namespaces, which is a way to isolate jobs from one another. This allows you to create granular ACL policies specific to a namespace.
The first thing you need to do is create a namespace for all of your jobs related to Vault management. The code below creates a namespace named vault-cluster:
resource "nomad_namespace" "vault" {
 name        = "vault-cluster"
 description = "Vault servers namespace"
}
Nomad job for Vault cluster
The next step is to write a Nomad job. Deploy a 3-node Vault cluster with the following parameters:
- Each Vault server must run on a separate Nomad client.
- They can only run on Nomad clients in the
vault-serversnode pool. - Vault will run as a Docker job.
- The job will use the host volumes configured on the Nomad clients to provide persistent storage for Vault.
Below is the complete Nomad jobspec:
job "vault-cluster" {
 namespace   = "vault-cluster"
 datacenters = ["dc1"]
 type        = "service"
 node_pool   = "vault-servers"

 group "vault" {
   count = 3

   constraint {
     attribute = "${node.class}"
     value     = "vault-servers"
   }

   volume "vault_data" {
     type      = "host"
     source    = "vault_vol"
     read_only = false
   }

   network {

     mode = "host"

     port "api" {
       to     = "8200"
       static = "8200"
     }

     port "cluster" {
       to     = "8201"
       static = "8201"
     }
   }

   task "vault" {
     driver = "docker"

     volume_mount {
       volume      = "vault_data"
       destination = "/vault/file"
       read_only   = false
     }

     config {
       image   = "hashicorp/vault:1.15"
       cap_add = ["ipc_lock"]

       ports = [
         "api",
         "cluster"
       ]

       volumes = [
         "local/config:/vault/config"
       ]

       command = "/bin/sh"
       args = [
         "-c",
         "vault operator init -status; if [ $? -eq 2 ]; then echo 'Vault is not initialized, starting in server mode...'; vault server -config=/vault/config; else echo 'Vault is already initialized, starting in server mode...'; vault server -config=/vault/config; fi"
       ]
     }

     template {
       data =
from HashiCorp Blog https://ift.tt/P3572Iz
via IFTTT
No comments:
Post a Comment