The recent changes in the virtualization market, particularly Broadcom’s acquisition of VMware, have compelled organisations to reassess their technology strategies. CSPs and MSPs, whose business models heavily depend on VMware, find themselves in a precarious position due to the new partnership policies imposed by Broadcom. Furthermore, the simplification of the product portfolio, the bundling of offerings, the discontinuation of perpetual licensing, and the shift in the CPU pricing model from socket-based to core-based have all led to increased ownership costs.
These changes have created a significant dilemma for organizations: they must either raise prices, risking a loss of competitiveness, or explore alternatives. For some, the termination of the partnership program means either shutting down operations or migrating to an alternative solution to guarantee business continuity. Regardless of the path chosen, there are numerous challenges that need to be addressed.
Apache CloudStack as an Open-Source Alternative
To meet the evolving needs of users, CloudStack 4.19 has introduced a new feature: “VMware to KVM Migration” – an important solution for enterprises transitioning between hypervisors. By facilitating a seamless migration from VMware to KVM hypervisor, CloudStack addresses current market challenges and provides a strategic tool for organisations seeking greater flexibility and efficiency in their virtualised environments. In this deep-dive exploration, we will cover the details of this new feature.
Feature Description
This feature allows CloudStack Administrators to migrate VMware instances from a VMware vCenter Datacenter to a KVM cluster managed by CloudStack, resulting in a newly imported instance. It supports VMware setups managed either by CloudStack or as standalone environments.
The feature is accessible through both the UI and API, extending the VM ingestion tool. Administrators can select Instances from the source VMware vCenter and import them into a KVM environment managed by CloudStack, preserving the disks and MAC addresses for each network interface.
Migration Sources
Existing Zones
CloudStack lists existing Zones and identifies any associated VMware Clusters. In this way, Administrators can select the VMware Instances for migration. Standalone ESXi hosts cannot be used as a source.
External VMware Datacenter
For VMware vSphere Datacenter not associated with any CloudStack Zone, Administrators can list the existing Instances by providing the vCenter IP address / hostname, the Datacenter name, and the necessary login credentials.
Preparing KVM environment
CloudStack uses virt-v2v tool to convert the Instances. This tool must be installed on at least one of the KVM hosts managed by CloudStack. Since this tool is not installed as a dependency of cloudstack agent, it must be installed separately.
If virt-v2v is not installed on a KVM host attempting a VMware Instance conversion, the process fails.
To prepare a KVM Host based on EL8 or EL9, execute the following commands:
dnf install virt-v2v
cat <<EOF >> /etc/cloudstack/agent/agent.properties
virtv2v.verbose.enabled=true
EOF
systemctl restart cloudstack-agent
When installing virt-v2v on Ubuntu KVM hosts, the “nbdkit” package (which is required to convert VMware Instances) is not installed by default. To install it, execute the following command:
apt install nbdkit
To avoid timeouts for the long-running instance migration operations we can set an appropriate timeout in CloudStack global configurations:
convert.instance.process.timeout
Below the supported Linux distributions to be used as KVM Hypervisor:
| Linux Distribution | Supported Versions |
| Alma Linux | 8, 9 |
| Red Hat Enterprise Linux | 8, 9 |
| Rocky Linux | 8, 9 |
| Ubuntu | 22.04 LTS |
In addition, to import Windows Instances, you need to install the Virtio drivers on the KVM hosts used for the conversion.
On RHEL (including derivatives of RHEL, ie. CentOS, Rocky Linux, etc.) hosts:
wget https://ift.tt/qH83K04 -O /etc/yum.repos.d/virtio-win.repo
dnf install virtio-win
For Ubuntu hosts:
apt install virtio-win
Migration Process Overview

Migrating VMware Instances to KVM Hypervisor
Existing VMware Clusters in CloudStack
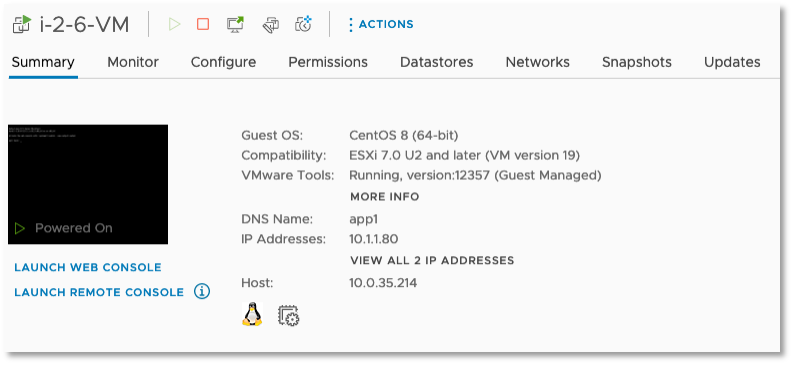
1. Let’s consider the ‘App1’ VMware Instance to be migrated to KVM hypervisor.
• View in CloudStack UI:

• View in vCenter:
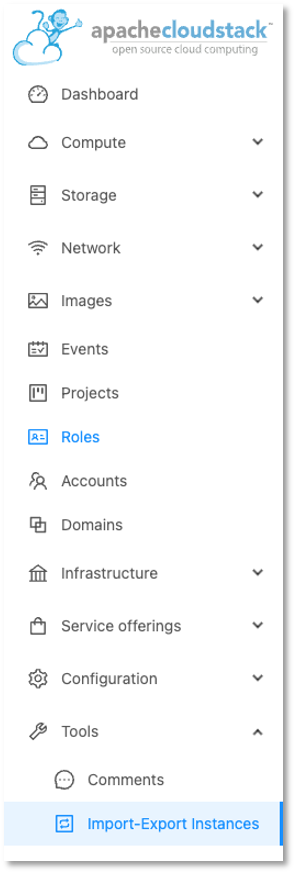
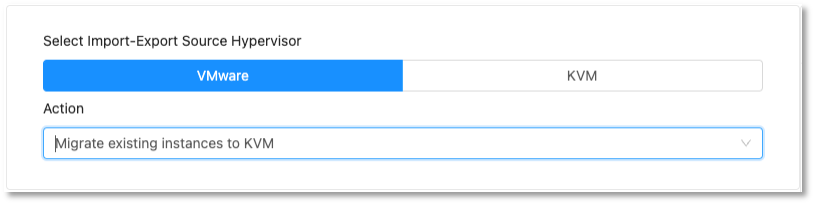
2. To proceed the migration, navigate to “Tools” > “Import-Export Instances” on the left navigation pane and then select the Source hypervisor type ‘VMware’.
3. In the action drop-down list, select “Migrate existing instances to KVM”.
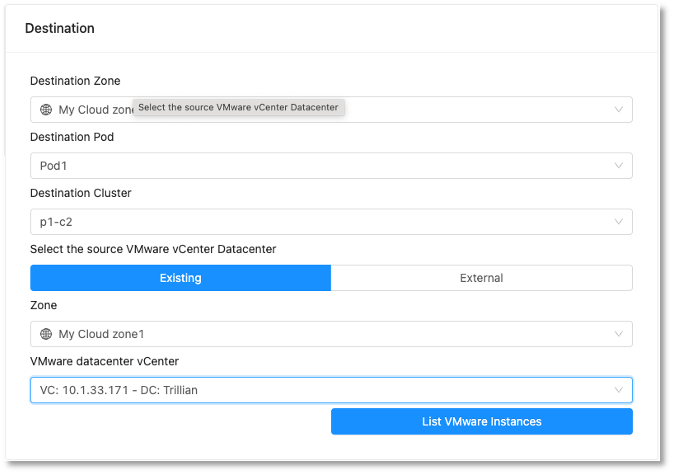
4. To define the destination KVM Cluster, under “Destination”, select the “Destination Zone”, “Destination Pod” and “Destination Cluster”.
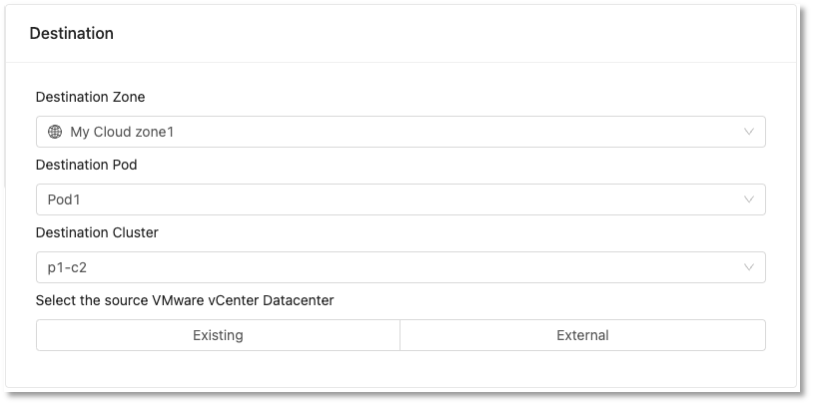
5. To define the source VMware vCenter Datacenter, select “Existing”, the “Zone” and the “VMware datacenter vCenter” and then click on “List VMware Instances”.
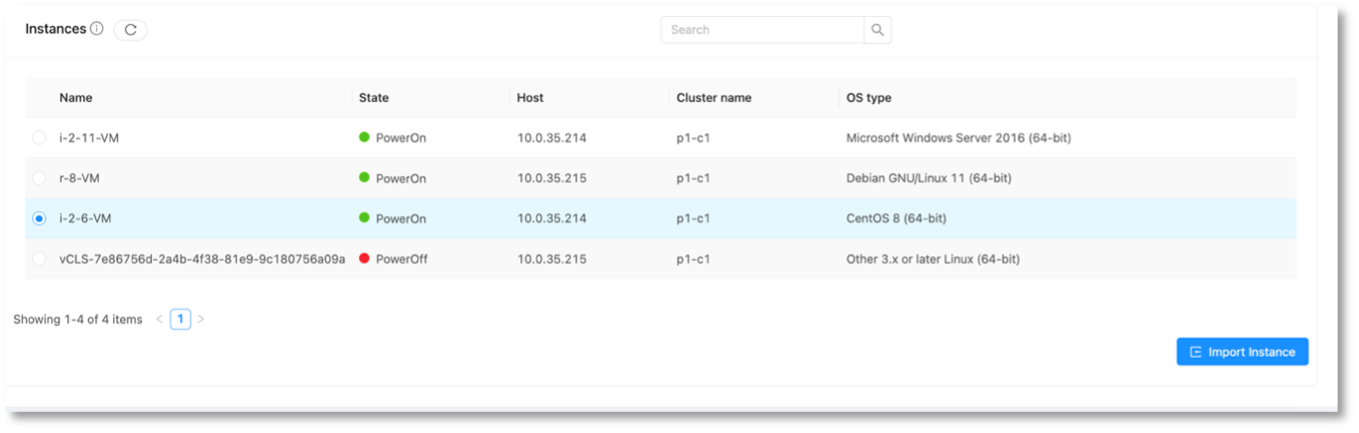
6. The Instances will be shown with the internal CloudStack name. Select the instance to be migrated and click “Import Instance”:
7. A form will be shown where details for the migrated Instance should be inserted, such as:
• Display name
• Host name
• KVM host with virt-v2v (if not selected, cloudstack assumes that all the KVM hosts have the package virt-v2v present)
• Compute Offering
• Network (make sure to select the ‘Allow duplicate MAC address’ since the source VM already exists in CloudStack)
• NIC
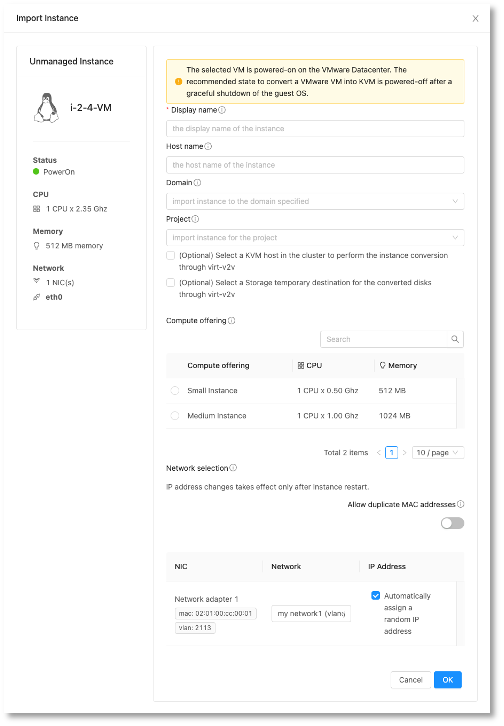
8. Clicking on ‘OK’ will start the migration process.
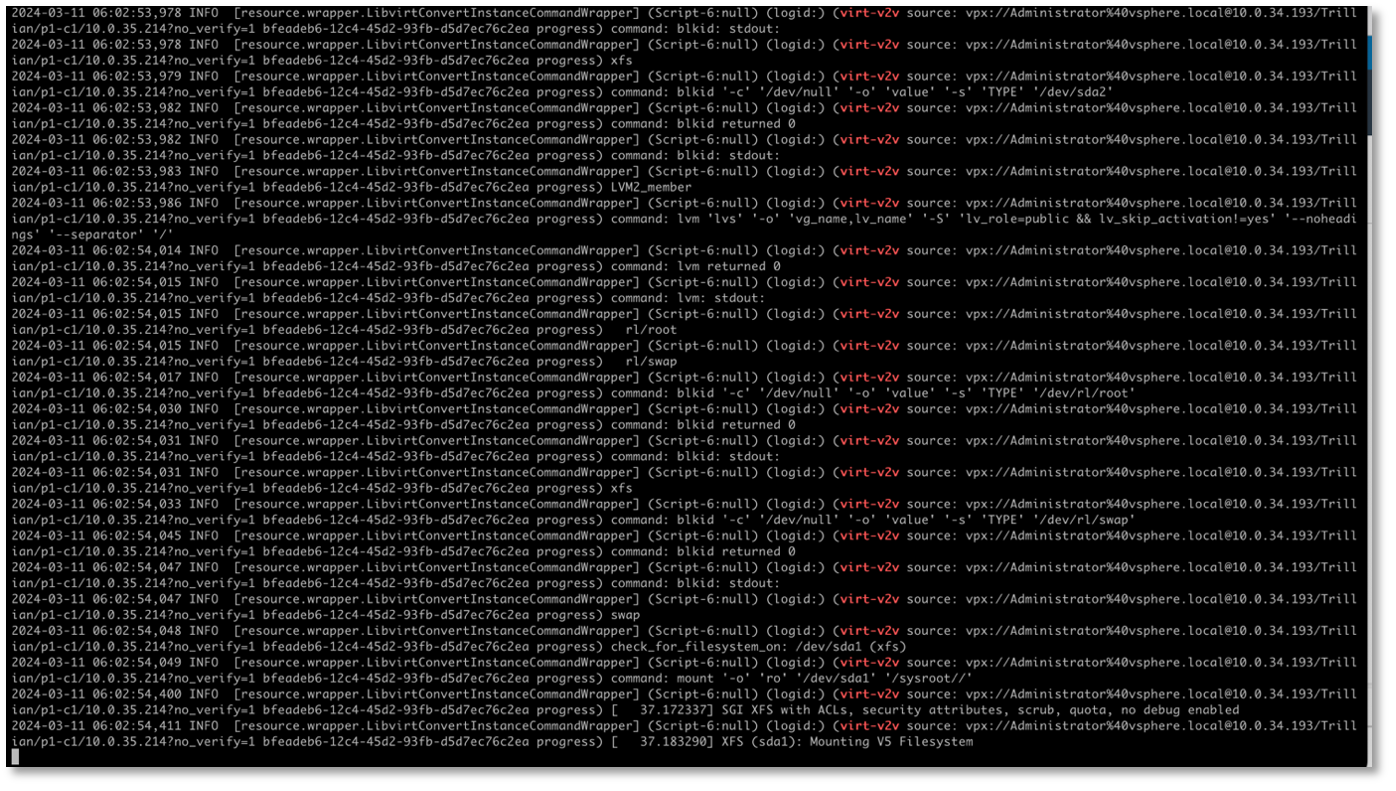
9. You can see the cloning operation in the vCenter tasks, the KVM host agent logs (/var/log/cloudstack/agent/agent.log) prints the conversion process details, and progress:
• vCenter
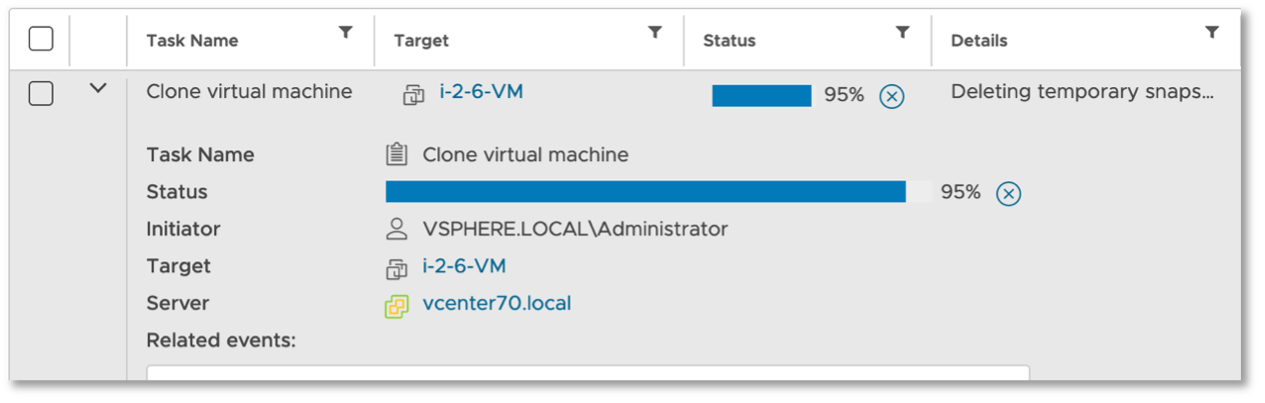
• /var/log/cloudstack/agent/agent.log
10. Once the migration is completed the instance will be available in the CloudStack’s Instances tab in ‘Stopped’ state. We can update the Guest OS type to the appropriate one before starting the migrated instance.

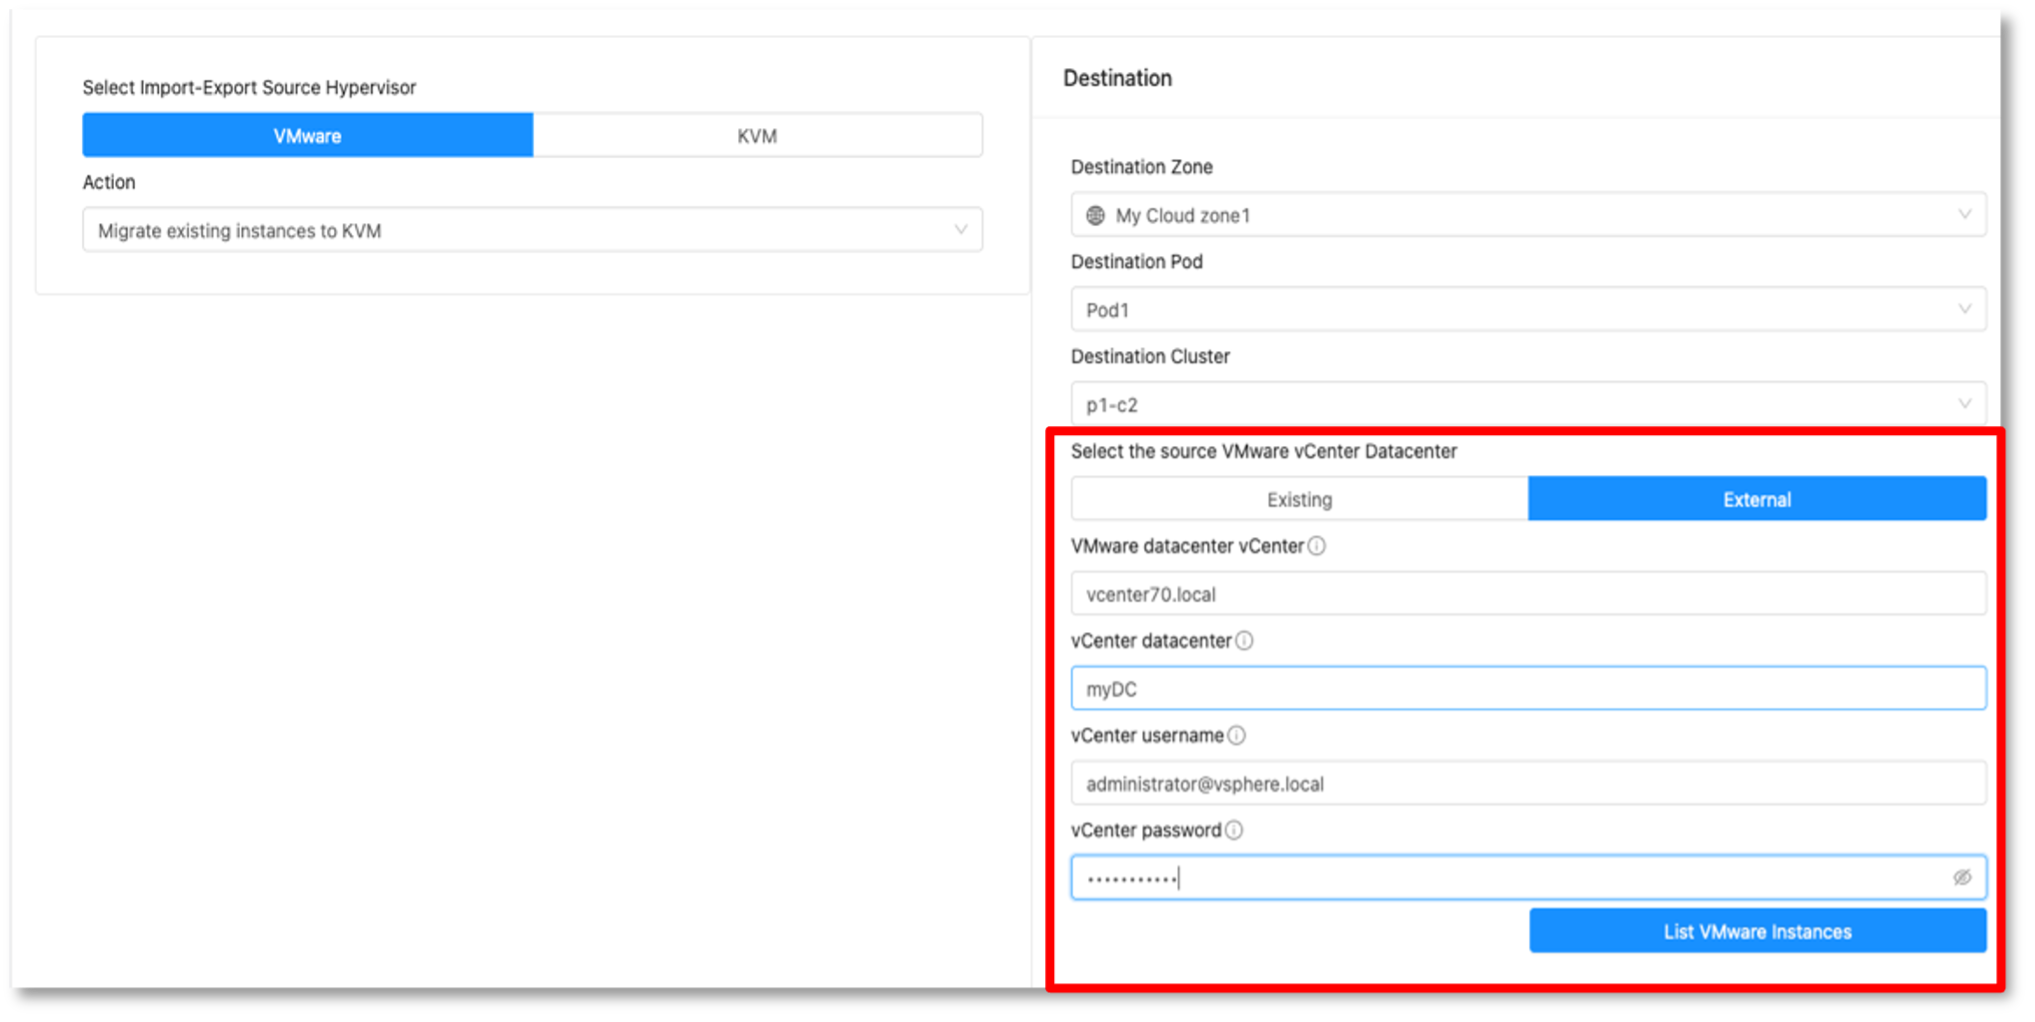
External vSphere Datacenter
1. When VMware vCenter is not managed by CloudStack, the Instance migration workflow is similar to the previous scenario, except for the source VMware vCenter Datacenter in the ‘Destination’ form.
2. To proceed, select the source “VMware vCenter Datacenter” as external source and insert the following details:
• VMware datacenter vCenter
• vCenter datacenter
• vCenter username
• vCenter password
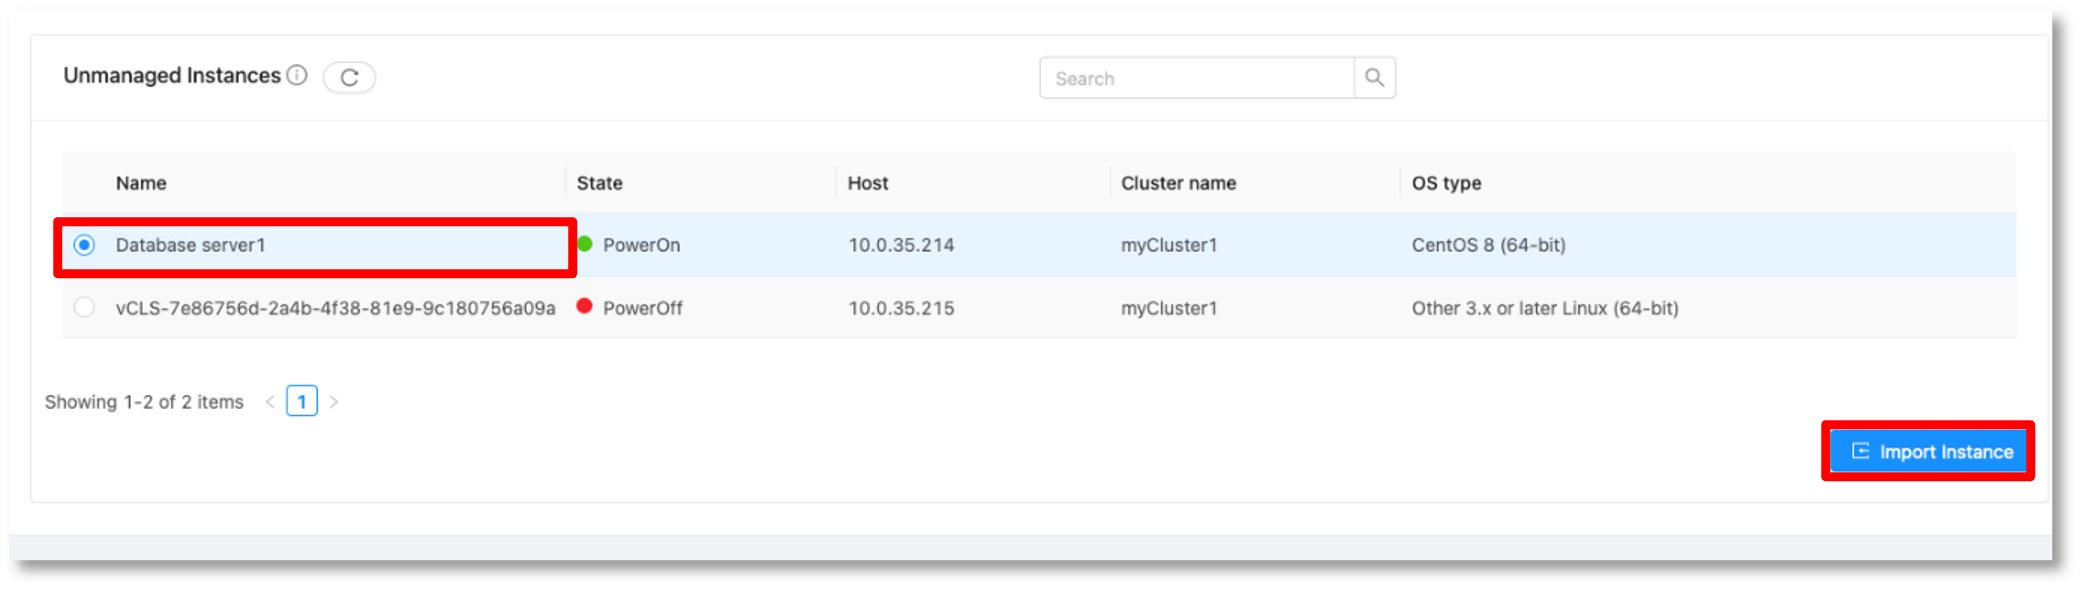
3. Clicking on the ‘List VMware Instances’ will list the unmanaged instances on the external vCenter. Select the Instance to be migrated and then click on ‘Import Instance’ button.
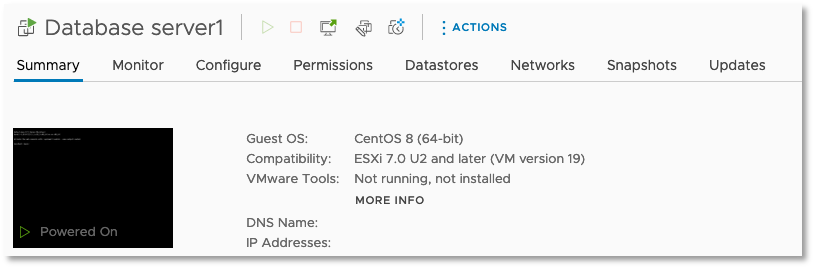
4. Following is the Instance in the vCenter UI:
5. The form is the same as the “Existing VMware Cluster”. In this case, you no need to select the ‘Allow duplicate MAC addresses’ option as previously. Clicking on “OK” button will perform the Instance conversion. The background processes are the same as “Existing VMware Cluster
Limitations
6. The current CloudStack 4.19 version, while successful, takes more time than expected. An improvement was addressed to the feature which should improve performance significantly, by reducing total time to the conversion process from CloudStack version 4.19.1 onwards.
7. It is not possible to import ‘Running’ Windows Instances.
8. This feature is made only for Administrator users. Domain Admin and regular Users can’t perform the migration tool as expected in the feature design.
Conclusion
The VMware to KVM migration tool in CloudStack will be of great use to any organisation considering CloudStack as an alternative to VMware. This feature uses virt-v2v internally and provides an easy-to-use UI and API calls for automation. During the CloudStack Collaboration Conference 2023, there was an in-depth session on this feature. You can watch it here: https://www.youtube.com/watch?v=B-hoNG_PPQk.
In addition, you can download the VMware Migration Guide for Apache CloudStack at this link:
https://www.shapeblue.com/vmware-to-apache-cloudstack-migration-guide/
The post CloudStack VMware to KVM Migration Tool | CloudStack Feature Deep Dive appeared first on ShapeBlue.
from CloudStack Consultancy & CloudStack... https://ift.tt/G7BstnF
via IFTTT
No comments:
Post a Comment