Apache CloudStack 4.21 introduced the Extensions Framework, a lightweight and flexible mechanism that allows external platforms to integrate with CloudStack’s resource lifecycle management. One of the built-in extensions included in CloudStack is support for Microsoft Hyper-V.
Traditional hypervisor integrations such as KVM or VMware rely on dedicated integration layers implemented as a part of the CloudStack codebase. While these integrations provide extensive functionality, they are more complex to understand and modify than extensions implemented through the Extensions Framework.
In contrast, the Hyper-V extension is implemented as a single Python script. This script acts as a built-in orchestrator, handling core Instance lifecycle operations such as Deploy, Start, Stop, Restart, Status and Destroy, while additional actions such as snapshot management are exposed through CloudStack Custom Actions. Its simplicity makes it easy to read, straightforward to customise, and accessible for users who want to extend it with additional functionality.
The Hyper-V extension runs on the CloudStack Management Server and communicates with Hyper-V hosts through WinRM over HTTPS.
Once an Instance is created using Hyper-V extension, it becomes part of the CloudStack networking model. Depending on the network type, CloudStack networking services such as DHCP, NAT, firewalling, load balancing, and ACL enforcement continue to operate as they would for instances running on native hypervisors.
For more details on the Extensions Framework read the blog here: https://ift.tt/vO3Wosh
Preparing the Hyper-V Environment
Each Hyper-V host is represented as a CloudStack Host. Before using the Hyper-V Extension, ensure that the CloudStack Management Server can communicate with the Hyper-V host over WinRM using HTTPS.
Configuring WinRM over HTTPS
Windows Remote Management (WinRM) is a Microsoft protocol used to manage Windows systems remotely through WS-Management (Web Services for Management). It enables remote execution of PowerShell commands over HTTP or HTTPS and is widely used by automation tools such as Ansible, Terraform, and Packer for managing Windows environments.
To set up WinRM over HTTPS on the Hyper-V host, the following requirements must be met:
- WinRM must be enabled and configured to listen on port 5986 (HTTPS).
- A valid TLS certificate must be installed and bound to the WinRM listener. This can be issued by a trusted Certificate Authority (CA) or be self-signed.
- The Hyper-V host firewall must allow inbound connections on TCP port 5986.
- The CloudStack Management Server must have network connectivity to the Hyper-V host on port 5986.
- A local or domain user account with sufficient permissions to manage virtual machines (such as creating, deleting, and configuring VMs) must be available on the Hyper-V host.
Installing pywinrm on the CloudStack Management Server
To allow CloudStack to communicate with the Hyper-V host over WinRM, install the pywinrm Python library on the Management Server. This library acts as a client for executing commands remotely on Windows systems via WinRM.
Networking
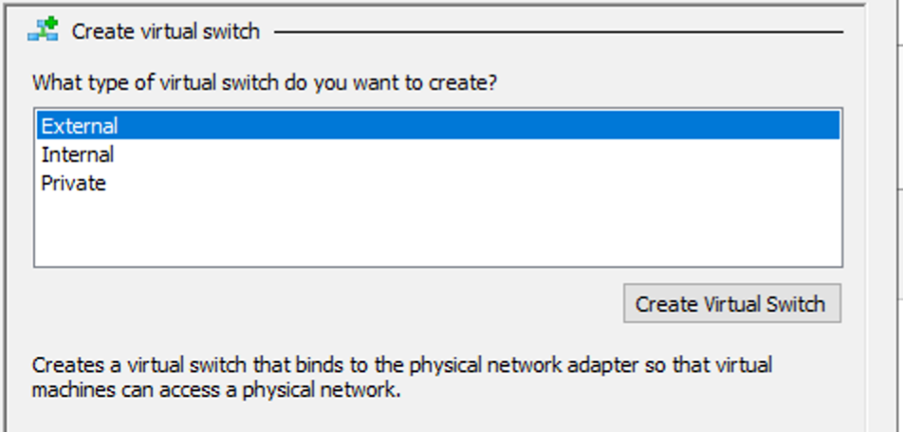
For the Hyper-V extension to work properly, Hyper-V hosts and CloudStack hypervisor hosts need to be connected over a VLAN trunked network. On each Hyper-V host, create an external virtual switch and bind it to the physical NIC that carries VLAN-tagged traffic. This switch is then specified in CloudStack as the network_switch when adding the Hyper-V host.
When CloudStack deploys a VM, it passes along key networking details in the Extension payload, including the assigned MAC address and VLAN ID. The Hyper-V host uses this information to create the VM, attach it to the configured external switch, and apply the correct VLAN.
Once the VM boots, it behaves like any other guest in a CloudStack network. It sends a VLAN-tagged DHCP request, which is picked up by the CloudStack Virtual Router (VR) responsible for that network. In Isolated Guest Networks, the Virtual Router responds with the appropriate IP configuration and networking services.
From that point on, there’s no special treatment. The VM shows up as a regular CloudStack instance, and users can manage it using the usual networking features like Egress Policies, Firewall Rules, Port Forwarding, and more through the UI or API.
Configuring Hyper-V in CloudStack
The Hyper-V Extension in Apache CloudStack is of type Orchestrator, which means the extension resource will be tied to a Cluster in CloudStack.
The Hyper-V extension must be registered with a Cluster, and then Hosts are added in CloudStack corresponding to each Hyper-V Host. Templates or ISOs are also created in CloudStack and mapped to the corresponding Template or ISO on the Hyper-V side.
Create a Cluster
To begin, add a Hyper-V Cluster in Apache CloudStack. In the CloudStack UI, navigate to Infrastructure -> Clusters, then click Add Cluster.
In the dialogue, select the appropriate Zone and Pod, define a Name, then set Hypervisor to External and Extension to HyperV and then click OK.

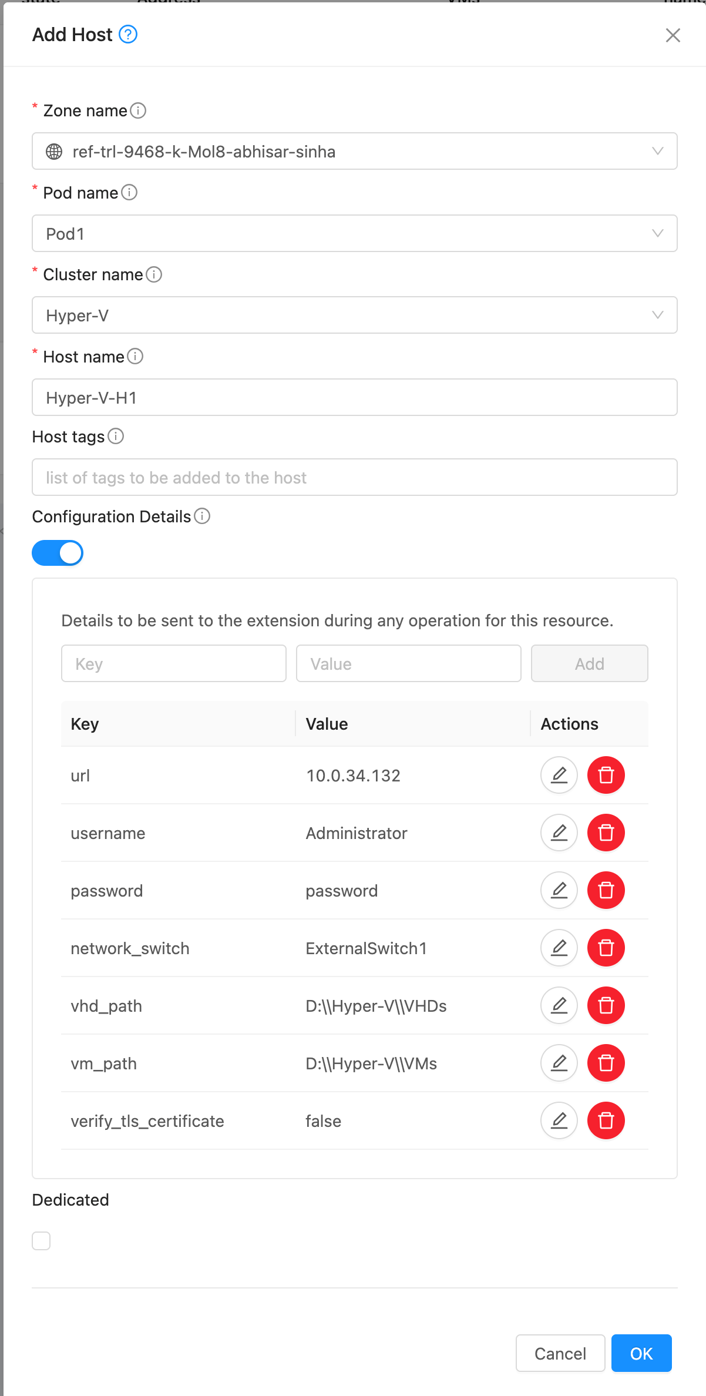
Add a Host
To add a Hyper-V Host, navigate to Infrastructure -> Hosts, then click Add Host.
In the dialogue, provide the required configuration details: url, username, password, network_switch, vhd_path, vm_path, and verify_tls_certificate.
As described in the Networking section, network_switch refers to the name of the external virtual switch created in Hyper-V.
vhd_path and vm_path specify the storage locations for VM disks and for VM configuration files and metadata, respectively.
If the Hyper-V host uses a self-signed TLS certificate, set verify_tls_certificate to false to skip certificate validation between the Apache CloudStack management server and the Hyper-V host.
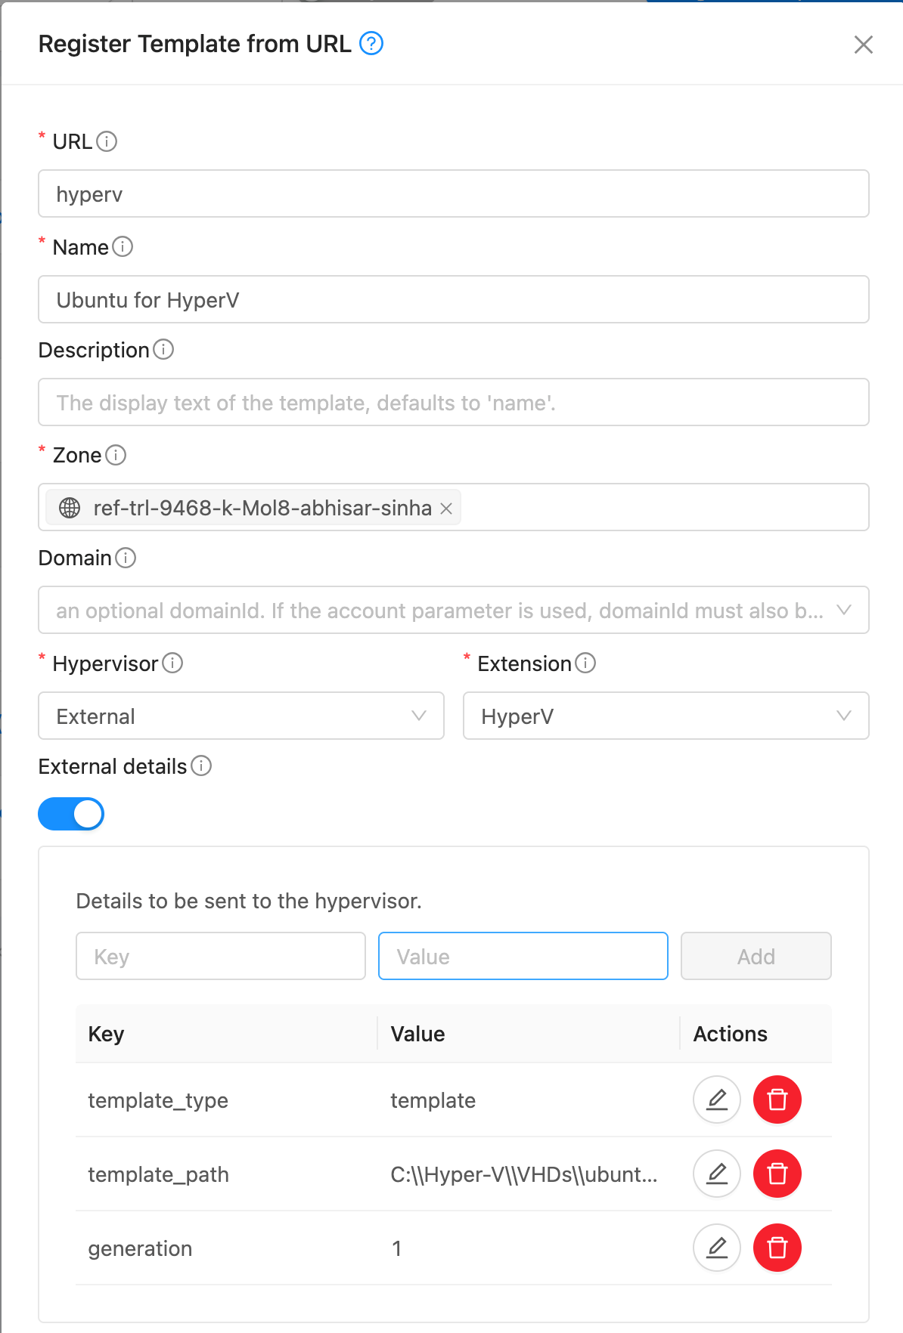
Create Template/ISO
Within the Extensions Framework, CloudStack represents both VM templates and installation ISOs through the Template registration workflow.
To add a new Template, navigate to Images -> Templates, set Hypervisor to External, and Extension to Hyper-V.
This Template acts as a CloudStack representation of an existing Hyper-V Template or ISO.
The URL field remains mandatory for compatibility with the standard CloudStack Template registration workflow, although it is not consumed by the Hyper-V extension.
Fill in the other fields as you normally would when registering a Template in CloudStack, such as Zone, OS Type, and other options.
Then, set the external detail template_type to either Template or ISO:
For ISOs, set
- iso_path to the corresponding file path in Hyper-V.
- vhd_size_gb to the VHD disk to create (in GB).
For Templates, set template_path to the Full path to the template .vhdx file
Finally, set the VM generation as either 1 (for legacy BIOS) or 2 (for UEFI).
Instance Operations in CloudStack
Deploying an Instance
To deploy an Instance, select the Template registered for Hyper-V in the Add Instance form.

The Instance will be provisioned on a Hyper-V host selected by the CloudStack scheduler. The VM in Hyper-V is created with the name ‘CloudStack Instance’s internal name’ + ‘-’ + ‘CloudStack Instance’s UUID’ to keep it unique.
Multiple Networks can be attached to the Instance during creation, and custom IP and MAC addresses can also be specified. The Instance is provisioned with the MAC address assigned by CloudStack and receives network configuration according to the guest network settings. The Instance will be connected to the Guest Network and CloudStack networking services will operate according to the selected network type.
Lifecycle Operations
Supported lifecycle operations include Deploy, Start, Stop, Reboot, Status and Destroy.
Custom Actions
In addition to the regular lifecycle operations, Custom Actions are also available, including Suspend, Resume, Create Snapshot, Restore Snapshot, and Delete Snapshot. These can be accessed by clicking the Run Action button.
Limitations
Because the Hyper-V integration is implemented through the Extensions Framework rather than a native hypervisor plugin, some CloudStack features are not currently available. Some of these limitations for Hyper-V are:
- Direct console access to Hyper-V VMs from CloudStack is not possible.
- Adding, removing, or modifying network interfaces after deployment is not currently supported.
- Advanced operations such as Instance migration and Instance scaling are not currently supported.
- SSH key injection and User Data services are not supported.
- Host capacity metrics and utilisation statistics are not currently reported back to CloudStack.
Troubleshooting
For Troubleshooting tips, please check out the Extensions blog here.
Conclusion
The Hyper-V extension demonstrates how the CloudStack Extensions Framework can integrate external virtualization platforms without requiring deep changes to the CloudStack codebase. By implementing the integration as a Python-based orchestrator, operators can quickly understand, adapt, and extend the behaviour to suit their own environments. While the current implementation focuses on core lifecycle management and networking integration, it provides a practical foundation for further Hyper-V automation within CloudStack.
More importantly, the Hyper-V extension serves as a practical example of how the Extensions Framework can be used to integrate platforms that would traditionally require a dedicated hypervisor plugin. The same approach can be adapted to support other virtualisation technologies and custom infrastructure platforms.
The post Integrating Hyper-V with Apache CloudStack using the Extensions Framework appeared first on ShapeBlue.
from CloudStack Consultancy & CloudStack... https://ift.tt/KJOQjVq
via IFTTT
No comments:
Post a Comment